
That moment when you need to move your TV but face the intimidating task of detaching it from your Sanus full motion wall mount is incredibly common. These mounts secure your television with multiple safety mechanisms designed to prevent accidental detachment, which means the reverse process requires specific knowledge of your particular mount model. Whether you’re rearranging your living space, preparing for a move, or simply need to access the wall behind your screen, understanding the correct procedure for your Sanus mount will save you from potential damage to your expensive television and mounting hardware. The good news is that Sanus full motion mounts follow just a few standard release patterns, and once you identify your specific model, the removal process typically takes less than five minutes.
Before attempting to remove your television, recognize that Sanus manufactures several distinct full motion mount variants, each with its own unique release system. Some models employ pull cords you must tug simultaneously, others use hex key-activated release tabs, and articulating mounts often require complete removal of set screws. Your first critical step is identifying which mechanism your mount uses—this determines your entire approach. This guide covers all major Sanus full motion mount types, so you can confidently remove your television regardless of whether you own a BLF228, VLF220, or another model in the Sanus lineup.
Gather Essential Tools Before Starting
Having the right tools ready before you begin prevents frustrating interruptions and ensures you can complete the removal process efficiently. Full motion mounts secure substantial weight—typically 40-125 pounds—so proper preparation is non-negotiable for safety.
Identify Your Required Hardware
Most Sanus mounts include either a 4mm or 5mm hex key in the original installation kit, which you’ll need for models with locking screw mechanisms. If you’ve misplaced this tool, a standard hex key set from any hardware store works perfectly. For articulating mounts with set screws, keep a Phillips head screwdriver with a snug-fitting tip—worn screwdrivers can strip screw heads during removal. If you encounter stubborn screws, have penetrating oil on hand to loosen corroded or overtightened hardware.
Never Work Alone
Full motion mounts secure heavy televisions in extended positions, creating significant leverage that makes single-person removal dangerous. Always enlist a helper who can support the TV’s weight while you operate release mechanisms. Position yourself on one side to manage the release system while your assistant supports the television from the opposite side—this balanced approach prevents tipping and gives you better control during detachment.
Clear Your Workspace Completely
Full motion mounts extend 10-20 inches from the wall, requiring more clearance than flat mounts. Remove all furniture, lamps, and decorative items from the area where the television will extend. Lay a soft blanket or moving pad on the floor where you’ll temporarily place the TV—this protects both the screen and cabinet finish from scratches. Ensure your temporary placement area is stable, level, and free of tripping hazards, especially important when maneuvering a heavy television.
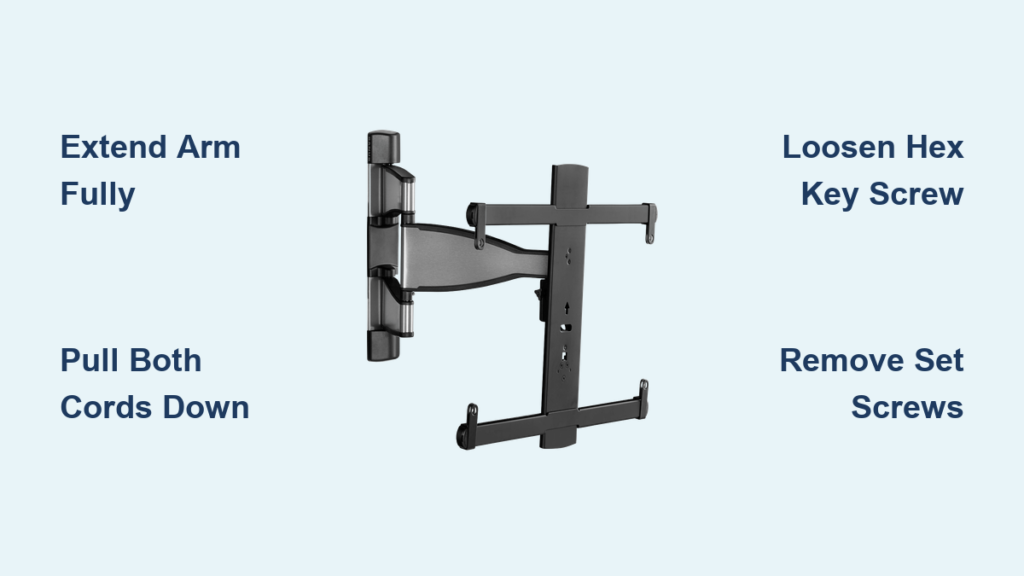
Extend the Mounting Arm Fully
Before accessing any release mechanism, you must extend your television outward to create workspace and expose hidden components. This step is crucial because many release mechanisms remain hidden when the mount is flush against the wall.
Pull the bottom of your television outward gently but firmly until the mount reaches its maximum extension. Most Sanus full motion mounts glide smoothly along their articulated arms with moderate pressure—don’t force the movement, as this can cause binding. Continue extending until you clearly see the back of the mounting assembly where release mechanisms are located. For pull cord models, this exposes the cords hanging from each bracket arm; for tab systems, it reveals the release tab position; and for set screw models, it provides access to the connection points. Take your time with this step—rushing can cause uneven extension that complicates the release process.
Release Pull Cord Systems in Under 60 Seconds
Many Sanus full motion mounts, particularly older models, use pull cord release mechanisms that provide straightforward television removal when executed correctly. This system is identifiable by two cords hanging from the bottom edge of each mounting bracket arm.
Locate Both Pull Cords Precisely
With your TV extended, examine the bottom edge of each mounting bracket where it connects to the wall assembly. You should see two pull cords (typically black or gray) with plastic or metal tabs at their ends. These cords control independent safety latches on each side of the mount—both must be activated simultaneously for proper release. If cords aren’t visible, they may be tucked behind the bracket; gently guide them downward to their natural hanging position.
Execute the Simultaneous Pull Technique
Position yourself and your helper on opposite sides of the television, each grasping one pull cord. On the count of three, pull both cords straight down with firm, even pressure. The key is perfect synchronization—pulling one side first creates binding that prevents clean release. You should feel resistance followed by a distinct “click” as both latches disengage. If no click occurs after a firm pull, check that cords aren’t tangled before trying again.
Complete the Detachment Motion
Immediately after releasing the latches, your helper should support the TV’s weight while you guide the bottom outward another 2-3 inches. Then lift upward while maintaining forward pressure—this combined motion frees the mounting brackets from their wall connections. The television should separate cleanly within seconds of releasing the latches. Never release the pull cords and then pause—the latches may re-engage, requiring you to restart the process.
Remove TVs From BLF228 and VLF220 Models Correctly
Sanus BLF228 and VLF220 mounts use a sophisticated tab-and-screw system that requires precise sequence execution. Many users struggle with these models because they miss critical nuances in the release procedure.
Loosen the Hex Key Locking Screw Properly
Locate the main locking screw near the bottom of the mount assembly—on BLF228 models it’s visible when extended, while VLF220 models position it near the bracket connection point. Insert your 4mm or 5mm hex key and turn counterclockwise just until the screw moves freely (about 1-2 full turns). Unlike pull cord systems, you don’t remove this screw completely—only loosen it enough to free the release mechanism. For VLF220 models, some installations omit this screw entirely, so don’t panic if you don’t find one.
Activate the Release Tab With Correct Motion
This is where most users fail with Sanus tab systems. On BLF228 models, you must pull the release tab downward firmly until it clicks. However, VLF220 models require pushing the tab inward (toward the wall) rather than pulling down—a critical difference that determines success. The tab is typically labeled “L” in installation diagrams and clicks audibly when fully activated. Apply deliberate pressure—you may need more force than expected to overcome the safety latch tension.
Execute the Perfect Lift-Off Motion
With the tab fully engaged, lift upward on the television while simultaneously pulling it forward at a slight angle. The BLF228 requires about 1 inch of upward movement before forward pull, while VLF220 models need more pronounced forward motion first. If resistance occurs, verify the tab is completely depressed—partial activation is the most common reason for failed detachment on these models. The television should release smoothly within 5 seconds of proper tab activation.
Remove Set Screws From Articulating Mounts Safely

Articulating Sanus mounts often use Phillips head set screws that must be completely removed before detachment—a process that can frustrate users when screws prove stubborn.
Identify and Access Set Screws
With the TV extended, locate small silver screws at the bottom connection point where each bracket arm meets the television back. These 10-20mm screws may be partially hidden behind the bracket housing—use a flashlight to confirm their position. Some models replace screws with removable knobs that unscrew in the same manner. Never mistake these for standard mounting screws; they’re specifically designed as release mechanisms.
Remove Screws Without Damage
Use a Phillips head screwdriver that fits the screw head perfectly—too large or worn tips will strip the head. Apply firm downward pressure while turning counterclockwise. If screws won’t budge, apply a drop of penetrating oil and wait 5 minutes before trying again. Remove both screws completely before attempting detachment—leaving even one partially inserted prevents clean release. Store removed screws safely; they’re small but essential for reinstallation.
Lift Free With Proper Technique
Once both screws are removed, lift the television straight up about 1/2 inch while maintaining slight forward pressure. The mounting brackets should disengage cleanly from the wall assembly. If resistance occurs, gently wiggle the TV side-to-side while lifting—this aligns mispositioned brackets that sometimes occur from regular mount movement. Never force the separation; additional wiggling usually resolves minor alignment issues.
Troubleshoot Stuck Mounts Like a Professional
Even when following correct procedures, you may encounter resistance due to environmental factors or installation variations. These proven solutions address the most common sticking points.
Solving the “Screw Removed But TV Won’t Release” Problem
This frustrating issue almost always means the release tab isn’t fully activated. On tab systems, you must depress the tab completely until it clicks—you can’t rely solely on screw loosening. Use a small mirror to verify tab position if you can’t see it directly. Apply firm pressure with a flat tool like a plastic spudger if finger pressure isn’t sufficient, but avoid metal tools that could scratch components.
Fixing Tangled or Obstructed Pull Cords
If pull cords move freely but latches don’t release, the cords may be knotted behind the bracket assembly. Carefully guide both cords downward while someone gently wiggles the TV side-to-side. This often releases hidden tangles. For persistent issues, fully extend the mount to maximum position—this creates slack that helps untangle cords naturally.
Removing Stubborn Set Screws Without Damage
When set screws refuse to turn, first confirm you’re using the correct screwdriver size—Phillips #1 or #2 typically works. Apply penetrating oil and wait 5-10 minutes before trying again. If the head starts stripping, use a rubber band between screwdriver and screw for extra grip. As a last resort, carefully drill out the screw head with a small bit, but this requires replacement hardware afterward.
What Stays Attached to Your Television After Removal
Understanding which components remain on your TV prevents unnecessary disassembly and simplifies reinstallation. The center vertical plate always stays secured to your television back, serving as the primary mounting interface. Both horizontal brace arms remain attached to this plate, extending outward from the center. The triangular hanging interface at the top stays connected to these braces, forming the complete mounting assembly that interfaces with the wall bracket. On set screw models, the horizontal bar with the screw holes moves with the television. These intentional design elements allow quick reinstallation without remeasuring or readjusting the TV’s position.
Maintain Your Mount After TV Removal
Taking 5 minutes to inspect and maintain your Sanus mount after removal extends its lifespan and ensures smooth operation for future use. Examine all pivot points for wear or corrosion, replacing any damaged components before reinstallation. Apply a light coat of silicone-based lubricant to moving joints—avoid petroleum products that attract dust. When reinstalling your TV, verify all hardware is tightened to manufacturer specifications; Sanus recommends hand-tightening plus a quarter-turn with tools. Proper maintenance means your Sanus full motion mount will operate smoothly for years, making future TV removals significantly easier.

