
Mounting your flat panel TV directly to the wall saves valuable floor space while creating a sleek, modern entertainment center that looks professionally installed. What many homeowners don’t realize is that this project costs nothing more than your time when you have basic tools and knowledge—professional installation typically runs $150-$350. With careful planning and attention to detail, you can securely mount your television in about an hour, ensuring years of safe viewing. The key to success lies in selecting the right mount type, understanding VESA compatibility standards, locating structural wall studs, and following a systematic installation process that prioritizes safety.
Most flat panel televisions weigh between 30-100 pounds, making proper installation critical to prevent damage or injury. Whether you’re mounting a 32-inch bedroom display or a 65-inch living room centerpiece, this guide provides everything you need to complete the job correctly the first time. You’ll learn how to choose the perfect mount for your viewing needs, position your television at the ideal height, and manage cables for a clean, professional appearance that enhances your viewing experience.
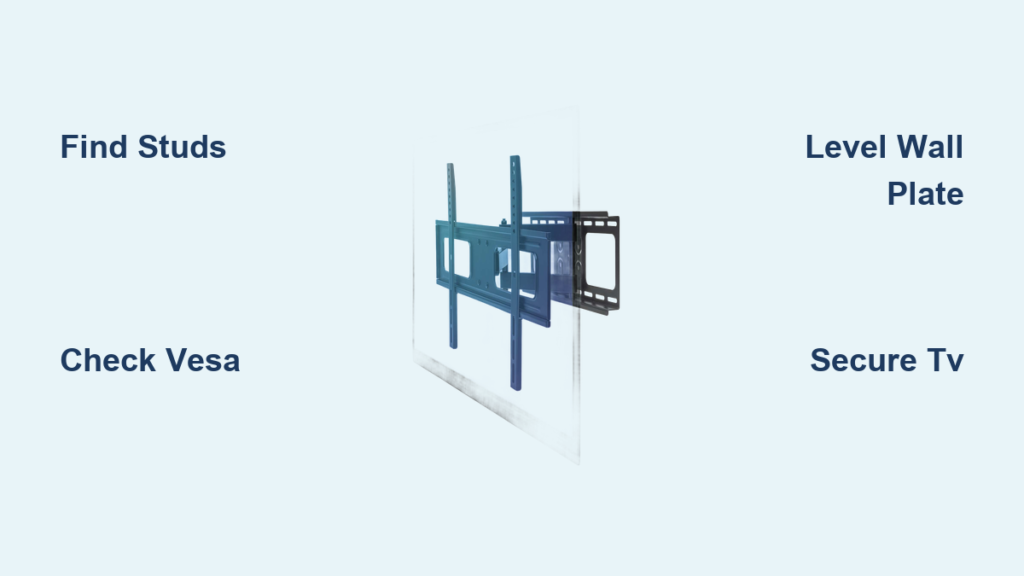
Select the Correct TV Mount Type for Your Room Layout

Choosing the right wall mount style dramatically impacts your viewing experience and determines how flexible your setup will be for different seating arrangements. The four primary mount types each serve specific viewing scenarios and room configurations.
Fixed mounts position your television flush against the wall for the most streamlined appearance with minimal visual footprint. These provide the cleanest look and typically cost less than adjustable options, but offer zero movement once installed. Avoid fixed mounts if your television will sit significantly above eye level, as viewers would need to look upward continuously, causing neck strain and potential glare issues from overhead lighting.
Swivel mounts add horizontal movement capability, allowing your television to pivot left and right. This proves invaluable when your viewing area spans multiple locations or when the television needs to be visible from different sides of the room. The horizontal adjustment helps maintain optimal picture quality across various seating positions without requiring viewers to strain their necks.
Tilting mounts provide vertical adjustment, enabling you to mount the television above eye level while still achieving comfortable viewing angles. These mounts tilt up and down, which proves especially useful in rooms where seating arrangements vary or where you need to reduce glare from windows and lights. A tilt mount allows viewers positioned lower (on a sofa or floor) to adjust the screen upward for better visibility.
Full-motion mounts combine all adjustment capabilities, extending away from the wall, pivoting left and right, and tilting up and down. These mounts provide maximum flexibility for complex rooms with multiple viewing positions, corners, or frequent glare issues. The trade-off involves higher cost and slightly more complex installation, but the versatility often proves worthwhile for frequently-used viewing areas.
Verify Your TV’s VESA Compatibility Before Purchase
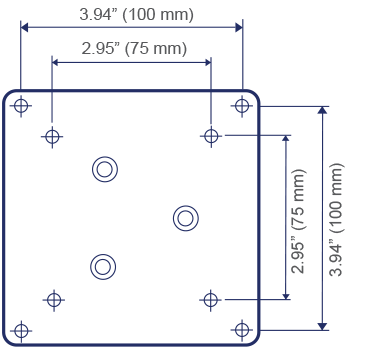
Before buying any mount, confirm your television’s compatibility with standard VESA (Video Electronics Standards Association) mounting patterns. This prevents costly mistakes and ensures your mount will properly attach to your specific television model.
Most modern flat panel televisions feature four mounting holes arranged in a square pattern on the back panel. VESA standards use numerical designations like “VESA 75” or “VESA 200” to indicate the spacing between these holes in millimeters. Check your television’s manual or measure the distance between the mounting holes yourself to determine your TV’s VESA specification.
Ensure the mount you select explicitly states compatibility with your television’s VESA pattern. Additionally, verify the mount’s weight capacity exceeds your television’s actual weight by at least 25% for safety. For example, if your television weighs 40 pounds, choose a mount rated for at least 50 pounds of support.
Locate Wall Studs for Secure TV Mounting
Finding wall studs represents one of the most critical steps in the installation process. Studs are the vertical wood or metal supports forming the structural framework behind your drywall, providing the necessary strength to support your television safely.
Use a modern stud finder by slowly running it across the wall while maintaining consistent pressure. The device will illuminate or emit a sound when detecting a stud edge. Mark both edges of the stud with a pencil, then find the center point midway between these marks—the ideal location for mounting screws.
Critical safety warning: Never mount your television using only drywall anchors. Always secure your wall plate to at least two wall studs for adequate support. Standard stud spacing is 16 or 24 inches on center, but verify spacing in your specific wall before drilling.
If you don’t have a stud finder, alternative methods include:
– Tapping the wall (hollow sound indicates no stud, solid sound indicates stud presence)
– Measuring 16 inches from electrical outlets or light switches (typically attached to studs)
– Running a magnet along the wall to detect drywall screws or nails
Determine Optimal TV Viewing Height for Comfort
Selecting the proper mounting height significantly impacts viewing comfort and long-term satisfaction with your installation. The ideal height depends on your television size, room dimensions, and typical viewing positions.
For most living rooms, position the center of the screen at or slightly below eye level when seated—approximately 42 inches from the floor for standard seating. However, larger rooms with farther viewing distances can accommodate higher mounting positions without causing neck strain.
Test potential heights using a cardboard cutout matching your television’s dimensions. Tape the template to the wall at various heights, then sit in your primary viewing position to assess comfort. Pay special attention to potential glare from windows and overhead lights at each test position.
Install Wall Plate with Perfect Horizontal Alignment

With your height determined and stud locations marked, you’re ready to install the wall plate that forms the foundation of your mounting system.
Hold the wall plate against the wall at your predetermined height, using a level to ensure perfect horizontal alignment. Identify which mounting holes align with your marked stud centers—these will receive the primary mounting screws that bear your television’s weight.
Drill 1/8-inch pilot holes at each marked location to prevent wall damage and ensure proper screw depth. With an assistant holding the wall plate, insert lag bolts through the mounting holes and into the studs. Before fully tightening all bolts, recheck the level to confirm the plate remains perfectly horizontal.
Pro tip: For mounts with multiple horizontal mounting slots, position the plate slightly lower than your final height. This provides upward adjustment room when hanging the television, as gravity will naturally pull it downward into position.
Attach TV Brackets Without Damaging Your Screen
Before mounting your television, remove any stand or legs attached to the back panel. Lay the television face-down on a soft blanket or protective surface to prevent screen damage.
Locate the appropriate screw holes on your television’s back panel that match your mount’s brackets. Feed the mounting screws through the bracket holes and turn them clockwise to secure the brackets to the television. Stop turning as soon as you feel resistance—over-tightening can damage the back panel or strip the mounting holes.
Common mistake to avoid: Using the wrong size screws. Most mounts include multiple screw sizes—select the ones that match your television’s thread pattern without protruding through the mounting holes.
Hang and Secure Your Television to the Wall Mount
This step requires at least one assistant due to the television’s weight. With one person on each side of the television, lift the device and carefully tilt the top toward the wall.
The brackets attached to the television should hook onto the top rail of the wall plate. Once engaged, slowly lower the television so the brackets fully seat into the wall plate. Listen for an audible click if your mount has automatic locking mechanisms.
For mounts without automatic locks, insert and tighten bottom security screws through the brackets and into the wall plate. These prevent accidental detachment and ensure your television remains securely mounted during normal use.
Conceal Cables for a Clean, Professional Appearance
After securing your television, connect power and AV cables before finalizing the installation. For fixed mounts, plug in cables before securing the bottom brackets—access becomes difficult once fully mounted.
For hidden wiring:
– Install an in-wall power extender behind the television (requires electrical knowledge)
– Use surface-mounted cord covers that attach to the wall and can be painted to match
– Employ cable management strips with adhesive backs to bundle and route wires neatly
Time-saving shortcut: Label each cable with masking tape before disconnecting from existing equipment. This prevents confusion when reconnecting devices behind your newly mounted television.
Perform Critical Safety Checks After Installation
Before considering your installation complete, conduct these essential safety checks:
Verify the television sits perfectly level by placing your level across the top edge. Most mounts include adjustment mechanisms that allow minor corrections after installation. Gently push on the television to test stability—there should be no wobbling or shifting.
Check that all mounting hardware is properly tightened, as vibrations can gradually loosen screws over time. Give the television a slight tug downward to confirm the brackets remain securely engaged with the wall plate.
Final safety reminder: Never mount televisions above fireplaces. Heat and soot damage electronics over time, and mantel heights typically position televisions too high for comfortable viewing, causing neck strain during extended use.
With proper preparation and careful attention to each step, your flat panel TV wall mount installation will result in a secure, professional-looking setup that enhances your viewing experience while freeing up valuable floor space. The satisfaction of completing this project yourself, combined with the significant savings compared to professional installation, makes this a rewarding home improvement task worth tackling.

