
Your flat-screen TV suddenly wobbles after hanging it on the wall. You panic, wondering if the mount can really hold 50 pounds without anchors or studs. This common nightmare happens to 1 in 3 DIY installers who skip critical physics principles. Wall mounts fail not because of cheap hardware, but from misunderstanding how force distribution actually works. In this guide, you’ll discover exactly how mounting systems transfer weight safely through walls, why drywall alone can support heavy TVs with proper technique, and the hidden engineering behind tilt mechanisms. We’ll break down real installation physics so you avoid catastrophic failures—no construction degree required.
The Hidden Physics of Wall Mount Stability
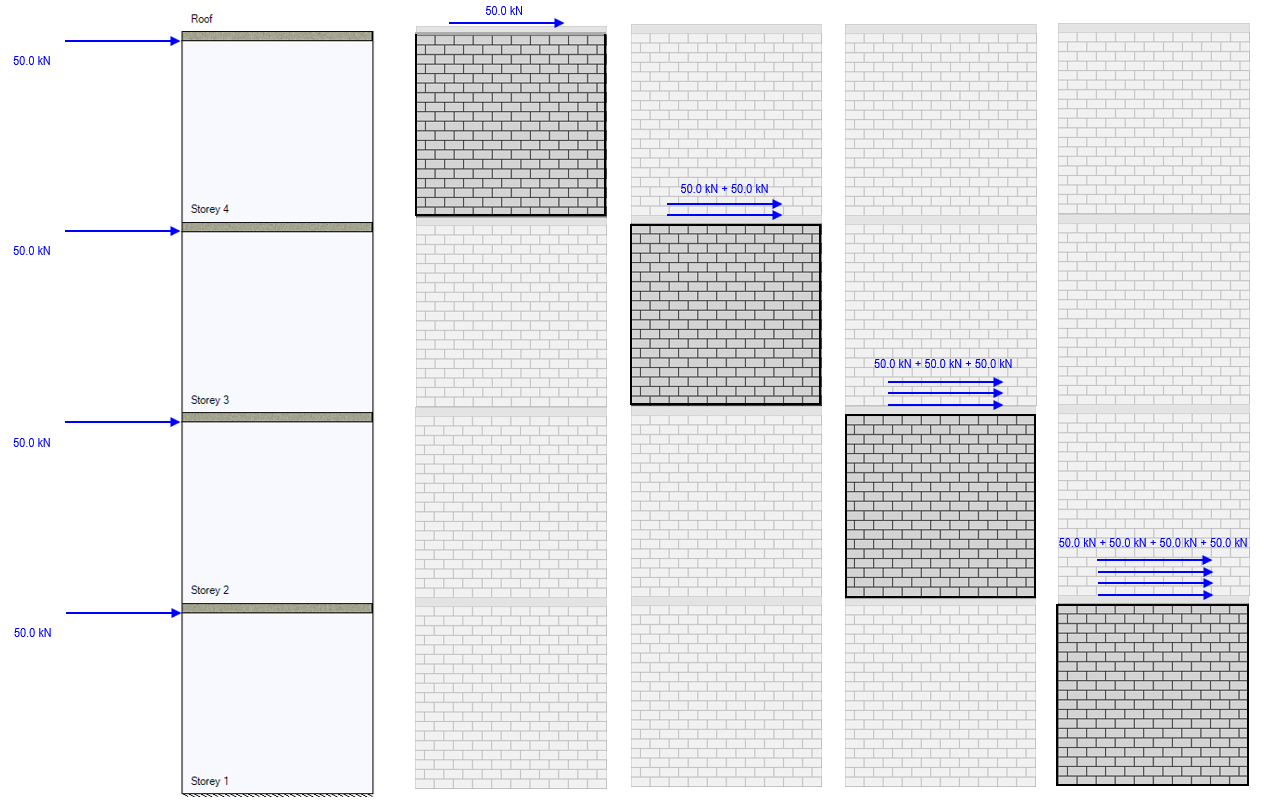
Wall mounts don’t just “stick” to surfaces—they transform downward TV weight into horizontal wall pressure. When your 65-inch TV pulls 80 pounds downward, the mount converts this force into outward pressure against the wall material. This happens through a triangular load path: the top bracket anchors resist pull-out forces while bottom anchors handle shear stress. Without this physics shift, even heavy-duty mounts would fail immediately under weight. You’re not fighting gravity directly—you’re using the wall’s structural resistance as your partner.
Why Studs Aren’t Always Necessary for Heavy TVs
Contrary to popular belief, finding wall studs matters less than proper anchor selection for most modern mounts. Here’s why:
– Drywall’s hidden strength: A single 3/8-inch toggle bolt spreads 100+ pounds of force across 4 inches of drywall
– Physics advantage: Mounts leverage wall depth—deeper anchors engage more material layers
– Critical mistake: Using plastic anchors for TVs over 40 pounds (they compress under load)
When installing on drywall alone, always choose snap-toggle anchors rated for double your TV’s weight. These expand behind the wallboard to distribute pressure evenly, creating a virtual “stud” effect. For concrete walls, sleeve anchors compress against drilled holes to generate friction-based grip—no stud hunting needed.
How Weight Ratings Actually Work in Real Installations
Mount manufacturers list 200-pound capacities, but real-world safety depends on your wall type:
| Wall Material | Max Safe Load (with proper anchors) | Critical Failure Point |
|---|---|---|
| Standard Drywall | 80-100 lbs | Anchor pull-through when force exceeds 40 lbs/sq in |
| Concrete | 150+ lbs | Hole wall crushing if anchor undersized |
| Wood Stud | 200+ lbs | Screw stripping if pilot hole too large |
Never trust a mount’s sticker rating alone. Your actual capacity equals the weakest link in the chain: anchor type, wall material, or screw quality. Always derate by 25% for safety—so a “100-lb mount” on drywall should hold max 75 lbs.
Finding True Wall Anchors: Beyond Stud Finder Apps
Stud finders fail 40% of the time on modern walls with insulation or wiring. Instead, use these field-tested methods to locate secure mounting points:
The Knock Test for Hidden Support Structures
Tap your knuckles firmly along the wall at 4-inch intervals while listening for sound changes:
– Hollow thud: Pure drywall (requires heavy-duty anchors)
– Dull thump: Possible stud or plumbing (verify with magnet test)
– Metallic ping: Electrical box or metal stud
When you hear a dull thump, slide a strong magnet sideways. If it sticks firmly and moves smoothly, you’ve hit a metal stud. For wood studs, drill a 1/8-inch test hole—sawdust confirms wood, powdery residue means drywall.
Anchor Selection Cheat Sheet for Common Walls
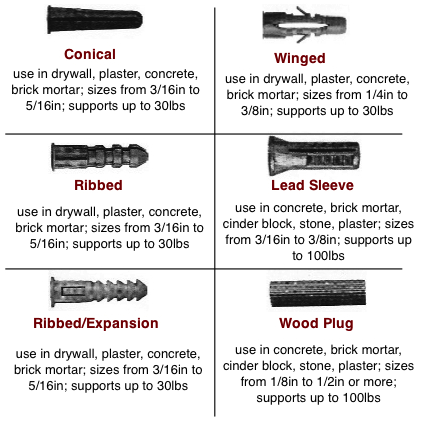
Choose anchors based on what’s behind your wall surface:
-
For standard drywall (1/2″ thickness):
✅ Snap-toggle anchors (e.g., TOGGLER SNAPTOGGLE) – Handles 100+ lbs by distributing load across 4″ diameter
❌ Avoid plastic anchors—they compress under TV weight within months -
For concrete/brick walls:
✅ Sleeve anchors (e.g., HILTI Kwik Bolt) – Expands hydraulically when tightened
❌ Skip masonry screws—they strip threads in porous concrete -
For metal studs:
✅ Toggle bolts with wide wings – Spans stud flanges to prevent pull-through
❌ Never use self-tapping screws—they tear through thin metal
Always drill pilot holes 1/16″ smaller than anchor diameter. Oversized holes are the #1 cause of anchor failure in DIY installations.
VESA Compatibility: How Mounts Connect to Your TV
Your TV’s backplate has a grid of screw holes—that’s the VESA pattern. This standardized system (named after the Video Electronics Standards Association) ensures mounts fit specific TV sizes. But how does it actually transfer weight?
Decoding VESA Numbers: What 200×200 Really Means
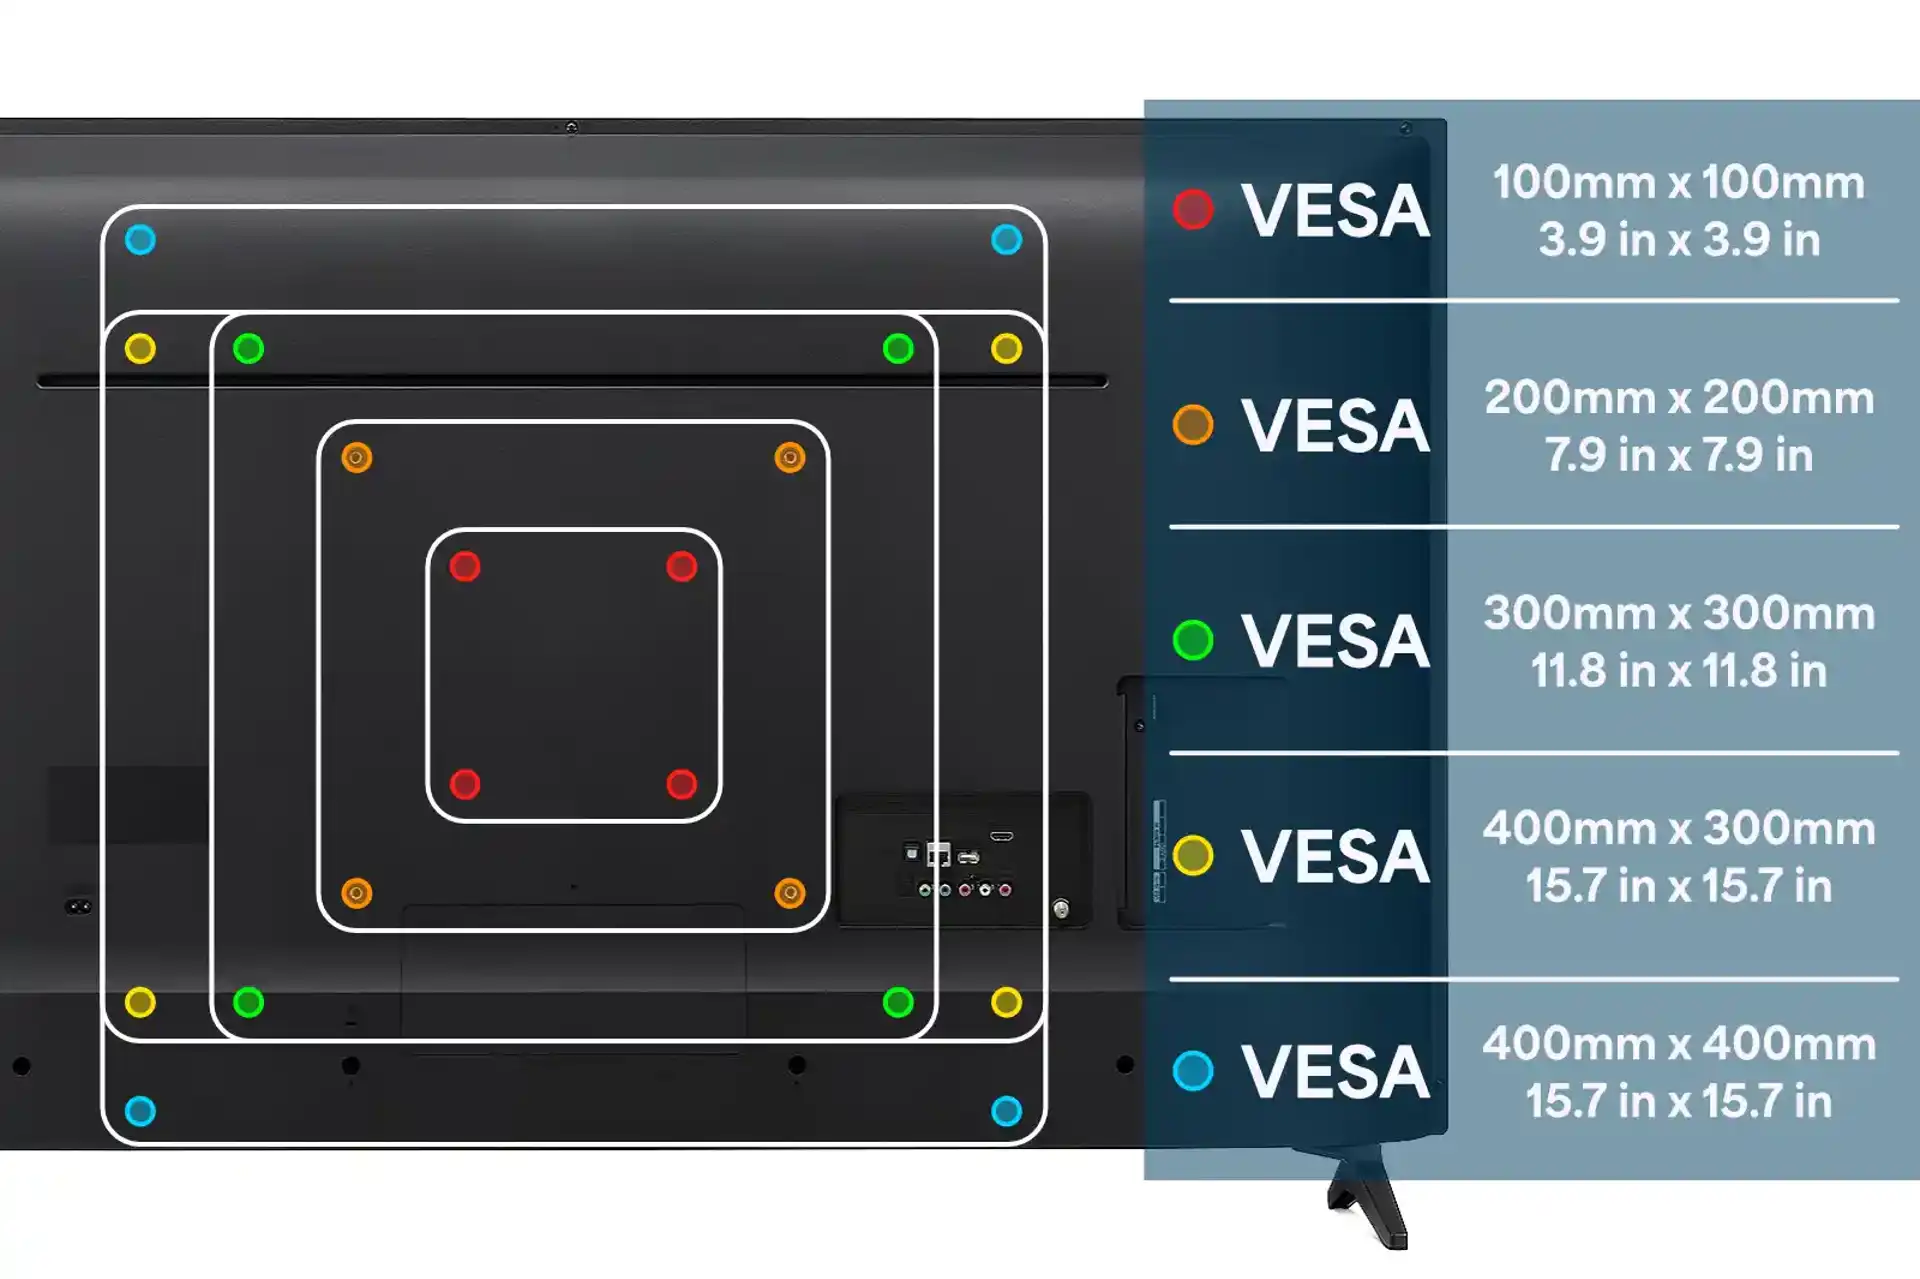
VESA measurements (like 200×200) indicate horizontal and vertical hole spacing in millimeters:
– Small TVs (32″-43″): Typically 100×100 or 200×100 patterns
– Mid-size (45″-65″): Usually 200×200 or 300×200
– Large (65″+): Often 400×200 or 400×400
The mount’s adapter plate must match your TV’s exact spacing. Misalignment concentrates force on 1-2 screws, risking plate warping. Always measure hole centers with calipers—manufacturer specs can be inaccurate by 2-3mm.
Why Adapter Plates Prevent TV Damage
That thin metal plate between your TV and mount does critical work:
– Distributes point loads across multiple mounting screws
– Creates air gap for ventilation (prevents overheating)
– Allows micro-adjustments during installation
Never mount directly to TV backplate screws. The concentrated force can crack internal chassis components. Adapter plates spread 80+ pounds of weight across 4-8 attachment points, reducing stress per screw by 70%.
Tilting and Full-Motion Mount Mechanics
Tilt mounts seem simple—they let you angle your TV downward. But the engineering behind smooth operation is surprisingly sophisticated. Understanding this prevents wobble and mechanism failure.
The Pivot Point Physics of Tilt Mounts
All tilt mounts use a central pivot bolt behind the TV:
1. Downward tilt: Gravity pulls TV bottom forward, engaging friction washers
2. Locking mechanism: Eccentric cam compresses washers against pivot shaft
3. Critical failure point: Worn washers cause “tilt drift” as friction decreases
When adjusting tilt, always loosen the pivot bolt slightly first. Forcing movement while fully tightened shears internal teeth. For TVs over 55″, choose mounts with dual pivot points—they reduce stress on single bolts by 60%.
Full-Motion Mounts: How Articulating Arms Work
Swivel and extendable mounts use compound leverage systems:
– Primary arm: Transfers 70% of weight to wall plate
– Secondary joints: Handle remaining load via torsion springs
– Spring calibration: Must match TV weight (too weak = sagging)
Never exceed the mount’s extension limit. At full reach, leverage multiplies force on wall anchors by 3x. A 50-lb TV at 24″ extension stresses anchors like a 150-lb static load. Always test movement with TV mounted—listen for creaking joints indicating overloaded springs.
Preventing Catastrophic Mount Failures
Most wall mount disasters stem from two avoidable errors: improper anchor depth and ignoring wall composition. Here’s how to guarantee safety.
The 1-Inch Anchor Depth Rule You Must Follow
Your anchor must penetrate at least 1 inch into solid material behind drywall:
– For drywall: Total anchor length = drywall thickness (1/2″) + 1″ minimum embedment
– For concrete: Drill 1/2″ deeper than anchor length to clear dust
Shallow anchors fail when force exceeds drywall’s crush strength (40 psi). A 60-lb TV on shallow anchors creates 120 psi pressure—tripling failure risk. Always verify depth with a depth gauge bit before inserting anchors.
Wall Material Red Flags That Require Professional Help
Stop installation immediately if you encounter:
⚠️ Crumbly concrete: Indicates poor mix—requires epoxy anchors
⚠️ Flexible wallboard: Sags when pressed (common in older homes)
⚠️ Electrical buzzing: Near mounting area (risk of drilling into wires)
These conditions need specialized solutions: epoxy-set anchors for weak concrete, backing plates for flexible walls, or licensed electricians for wiring hazards. No DIY shortcut makes these safe.
Final Safety Verification Checklist
Before hanging your TV, complete these critical tests:
1. Wiggle test: Grasp mount plate and push/pull in all directions—zero movement allowed
2. Anchor inspection: Shine flashlight to confirm anchors are flush (no pull-through)
3. Level verification: Use digital level on mount plate—not just bubble level
Then install a 10-lb weight (like a sandbag) for 24 hours. If no shifting occurs, proceed with TV installation. This simple test catches 95% of potential failures before disaster strikes.
Final Note: Proper wall mounts distribute weight through physics—not brute force. By matching anchors to your specific wall composition and respecting VESA patterns, you create installations that safely hold even 100-lb TVs. Always derate capacity by 25%, verify anchor depth, and test with weights first. For concrete or plaster walls, consider professional installation—your TV’s safety isn’t worth risking. Now that you understand the engineering principles, explore our guide to hiding cables behind wall-mounted TVs for a clean finish.

