
When your bedroom TV only faces the bed but you want to watch while working at your desk, or your living room seating spans multiple directions, a properly installed swivel TV wall mount solves these viewing challenges instantly. Unlike fixed mounts that lock your television in one position, swivel mounts let you rotate the screen toward different seating areas without moving furniture or straining your neck. How to install a swivel TV wall mount correctly ensures your television stays securely mounted while delivering the flexible viewing experience you need. This guide walks you through every critical step to achieve a professional installation that handles daily adjustments without compromising safety.
Attempting a swivel mount installation without proper planning leads to frustrating problems like wobbling screens, restricted rotation, or worst-case scenario—catastrophic failure. The complexity varies dramatically based on your wall construction, television weight, and specific mount design. Mounting directly to wall studs provides the most secure foundation, while shelf-mounted solutions require different considerations for compressed wood materials. Understanding these variables before you begin prevents dangerous mistakes and ensures your installation meets safety standards that protect both your expensive television and your household.
Determine Your Optimal Swivel Mount Position Before Installation
Measuring your room dimensions for full rotation clearance prevents the most common swivel mount frustration: discovering your TV hits the wall or furniture when rotated. Before purchasing hardware, map out your viewing area and identify where people typically sit. For bedroom installations, measure from the bed position to your desk chair location. In living rooms, note all seating positions that require viewing access. Your mount must allow the television to rotate fully between these points without obstruction.
Calculate your ideal viewing height based on primary seating arrangements and television size. For standard seating, position the center of the screen at eye level when seated—typically 42 inches from the floor for couches. In bedrooms where viewing occurs from both sitting and lying positions, consider mounting slightly higher (48-50 inches) to accommodate both angles. Remember that swivel mounts add 2-4 inches of depth beyond the wall surface, so factor this into your clearance calculations for furniture placement.
Select the Right Swivel Mount for Your TV Size and Weight
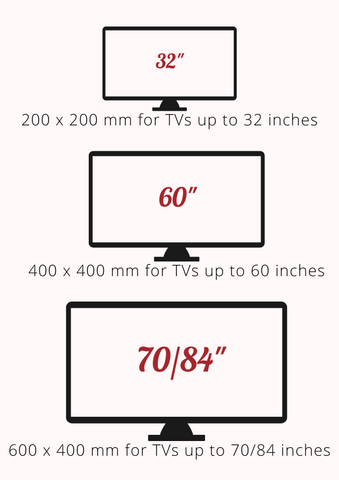
Verify VESA compatibility between your television model and potential mounts before purchasing. Nearly all modern TVs use standardized VESA mounting patterns (measured in millimeters between screw holes), but these vary significantly between brands and sizes. Check your TV manual or manufacturer website for the exact VESA pattern (e.g., 200x200mm, 400x400mm). Mounts clearly indicate compatible VESA patterns—select one that matches your television’s specifications exactly.
Check weight capacity against your television’s specifications with a 50% safety margin. If your TV weighs 40 pounds, choose a mount rated for at least 60 pounds. This buffer accommodates installation variables, material settling over time, and the dynamic forces created when adjusting the swivel position. Never exceed the manufacturer’s weight rating—doing so risks catastrophic failure that could destroy your television or cause injury.
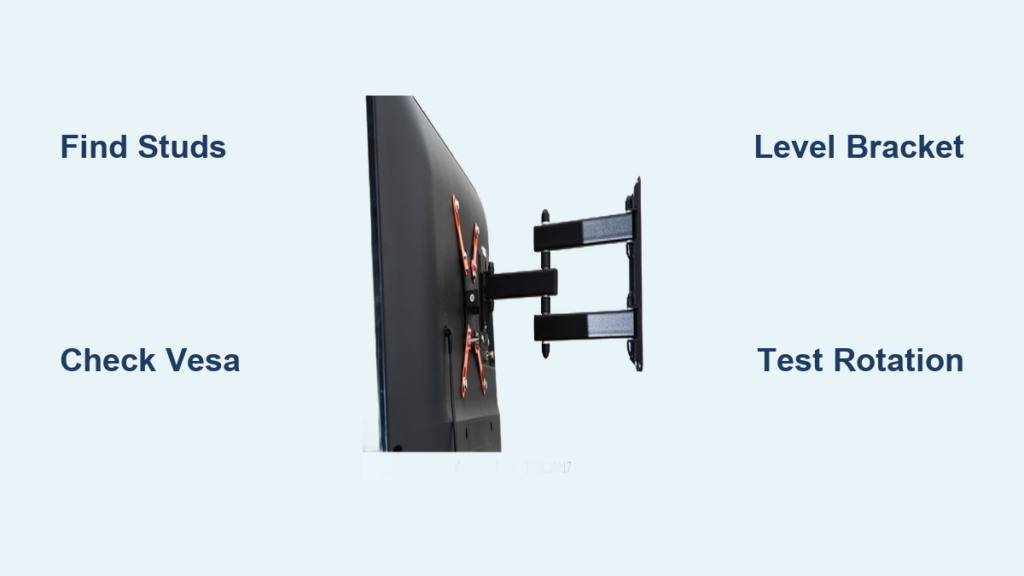
Locate Wall Studs Accurately for Secure Swivel Mount Installation
Use professional stud finder techniques to identify solid wood framing behind drywall. Electronic stud finders provide more reliable results than magnetic versions, especially in older homes with irregular construction. Scan horizontally across your planned mounting area, marking both edges of each stud you detect. The center point between these edges provides optimal screw holding power—mark these centers clearly with painter’s tape that remains visible during installation.
Mark stud locations with vertical lines indicating their full width, not just center points. Swivel mounts typically require engagement with two or more studs due to their wider bracket design. Verify your marks by gently probing with a small nail—if you hit solid wood within 1-1.5 inches, you’ve confirmed a stud location. Note any electrical boxes or plumbing fixtures that might interfere with your planned mounting position and adjust accordingly.
Gather Essential Tools for Swivel TV Mount Installation
Assemble must-have drilling equipment before starting your how to install a swivel TV wall mount project. You’ll need a power drill with wood-boring bits sized slightly smaller than your mounting screws (typically 3/16 inch for 1/4-inch lag bolts), a stud finder, bubble level, tape measure, and safety glasses. For precise alignment, a laser level saves significant time compared to traditional bubble levels, especially for taller installations.
Collect critical measuring and leveling tools to ensure perfect horizontal alignment. A 4-foot level verifies bracket positioning across the full width of your mount. Combination squares help transfer measurements accurately between the wall and bracket. Painter’s tape creates clean, removable marking surfaces that won’t damage your wall finish. Having all tools ready prevents frustrating interruptions mid-installation.
Install Wall Bracket with Perfect Horizontal Alignment

Position your mounting bracket against the wall at your planned height, using a level to verify perfect horizontal alignment before marking any holes. The bracket must sit level even before you drill—once fastened, correcting misalignment becomes extremely difficult. Mark each mounting hole position through the bracket’s openings with a pencil, then double-check alignment with your level before proceeding.
Drill pilot holes at your marked positions using a bit slightly smaller than your mounting screw shank diameter. This ensures screw threads engage the wood effectively while allowing the screw to draw the bracket tightly against the wall. Drill to a depth that accommodates your full screw length plus bracket thickness—typically 1.5-2 inches for standard wall studs. Avoid drilling too deep, which reduces holding power by limiting wood engagement.
Attach TV Plate Without Damaging Your Television
Match bolt size precisely to your television’s VESA pattern specifications before attaching the mounting plate. Most mounts include multiple bolt sizes—select those that thread completely through your TV’s mounting holes without protruding internally where they could damage components. Hand-tighten all bolts initially, then finish with a screwdriver for final snugging. Never overtighten, as this can crack your television’s mounting points or internal components.
Test mount plate engagement with the wall bracket before mounting your television. With a helper supporting the TV, position the plate to engage with the wall bracket according to your mount’s design. Some mounts use cam locks that engage automatically when the plate drops into place, while others require separate fasteners. Verify secure connection at every point before releasing support of the television.
Manage Cables for Unobstructed Swivel Movement
Calculate required cable length for full rotation to prevent wire damage during swivel operation. Cables must maintain proper connection at extreme angles without stretching, pinching, or binding. For mounts rotating 90 degrees, add at least 12-18 inches of slack beyond what’s needed for a fixed position. Test cable tension throughout the full range of motion before final installation—cables should remain loose at all angles.
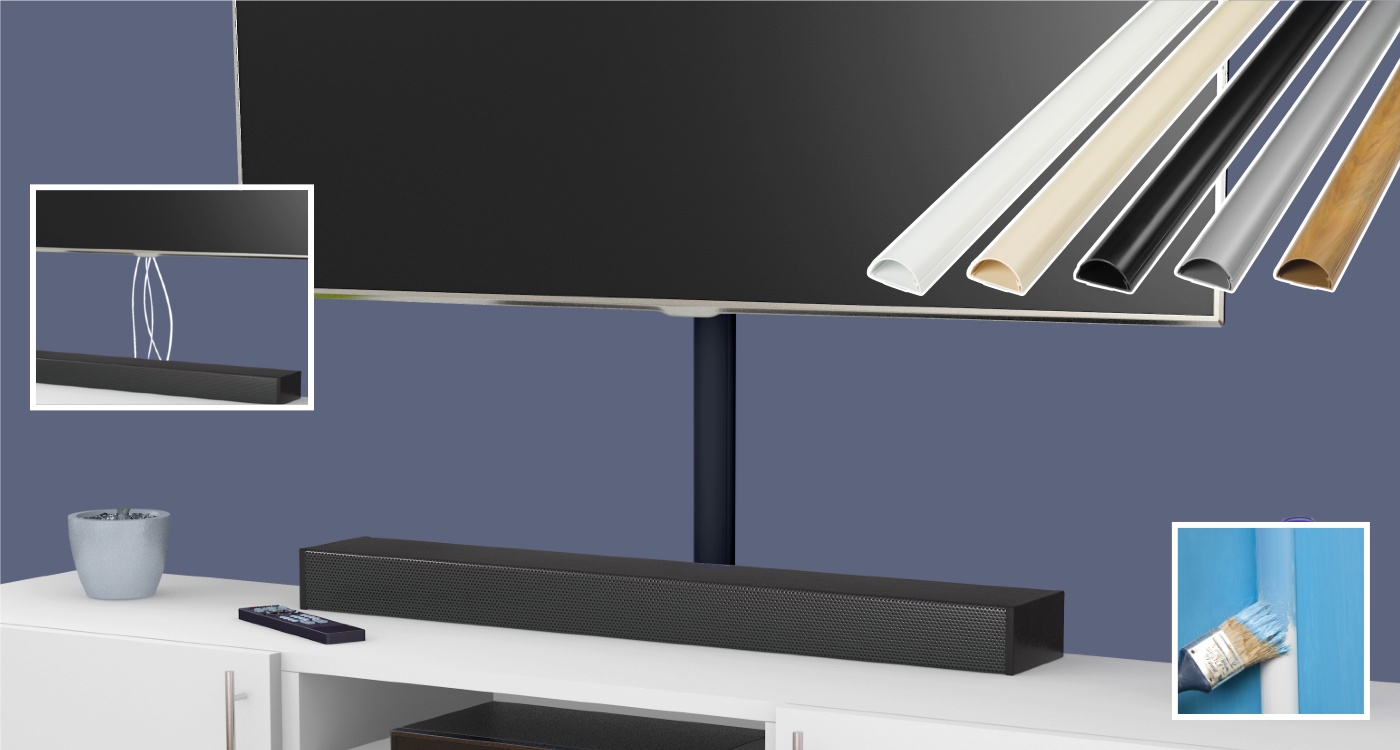
Hide wires with professional raceway solutions that maintain clean aesthetics. Paintable plastic raceways mount discreetly along the wall surface, concealing power and signal cables while allowing full swivel movement. For shelf-mounted installations, route cables through the shelf structure using pre-drilled holes or cable management channels. Proper cable management prevents interference with swivel mechanisms and eliminates visual clutter.
Test Swivel Functionality and Safety Before Final Use
Verify full range of motion without obstructions by rotating your television through its complete arc. Check that the screen doesn’t contact adjacent walls, furniture, or doorways at any point in its rotation. Listen for unusual sounds or binding that might indicate misalignment. Apply gentle pressure at different angles to test stability—there should be no wobble or movement at the mounting points.
Check mount stability under dynamic conditions by simulating regular use. Gently rotate the television back and forth 5-10 times through its full range, then recheck all mounting hardware for tightness. This identifies potential loosening that might occur during normal operation. Never skip this critical safety check—a mount that feels secure when stationary may reveal weaknesses under movement.
Troubleshoot Common Swivel Mount Installation Problems
Fix binding issues in the rotation mechanism by identifying interference points. If your TV catches at specific angles, examine where components contact each other. Often, a slight adjustment of the wall bracket or TV plate alignment resolves binding. For persistent issues, apply a small amount of silicone-based lubricant to pivot points—never use oil-based lubricants that attract dust and debris.
Eliminate wobble in wall-mounted televisions by verifying stud engagement. Wobble typically indicates inadequate fastener penetration into studs or placement near stud edges. Remove the mount and reposition to ensure screws engage solid wood at least 1.5 inches deep. For stubborn wobble, add a backing board between the wall and bracket to distribute pressure more evenly across the mounting surface.
Maintain Your Swivel Mount for Long-Term Reliability
Schedule quarterly safety inspections to catch developing issues before they become serious problems. During each inspection, verify fastener tightness at all mounting points, examine the wall surface for stress cracks, and test the swivel mechanism for smooth operation. Pay special attention to compressed wood shelf installations, which require more frequent checks for material compression around mounting points.
Prevent material degradation in humid environments by controlling moisture exposure. Compressed wood shelves (MDF, particleboard) are particularly vulnerable to humidity-induced dimensional changes that cause fastener loosening. Use a dehumidifier in problematic spaces or consider switching to solid wood shelves for critical installations. For wall-mounted units in humid climates, check mounting hardware more frequently as temperature fluctuations accelerate material fatigue.
Following these precise steps for how to install a swivel TV wall mount guarantees a secure, functional installation that delivers flexible viewing for years. Remember that proper stud engagement, adequate weight capacity, and thorough safety testing form the foundation of any successful installation. When in doubt about your wall structure or mounting capabilities, consult a professional installer—your television’s safety and your family’s well-being are worth the investment. With regular maintenance and proper installation techniques, your swivel mount will provide seamless viewing adjustments without compromise.

