
Nothing transforms a bathroom or kitchen quite like a wall mounted faucet installation. Unlike traditional deck-mount fixtures that sit on your sink or countertop, wall-mounted faucets create that coveted floating appearance while freeing up valuable sink space. This sleek design not only elevates your room’s aesthetics but makes cleaning significantly easier since there’s no base to wipe around. If you’ve ever wondered how to install a wall mounted faucet properly, you’re in the right place—this guide delivers every critical detail you need for professional results. Whether you’re renovating a commercial restroom or upgrading your home bathroom, understanding the unique requirements of wall-mount faucet installation prevents costly mistakes and ensures reliable operation for years.
The installation process differs substantially from standard faucet replacement projects. Wall-mount faucets require coordination between framing, plumbing, and finish work since the mounting hardware installs during early construction phases while the wall remains accessible. If you’re retrofitting an existing wall, be prepared for more extensive demolition and repair work compared to simple fixture replacements. Taking time to plan thoroughly before cutting into walls prevents costly mistakes and ensures your faucet, sink, and backsplash align perfectly when the project concludes.
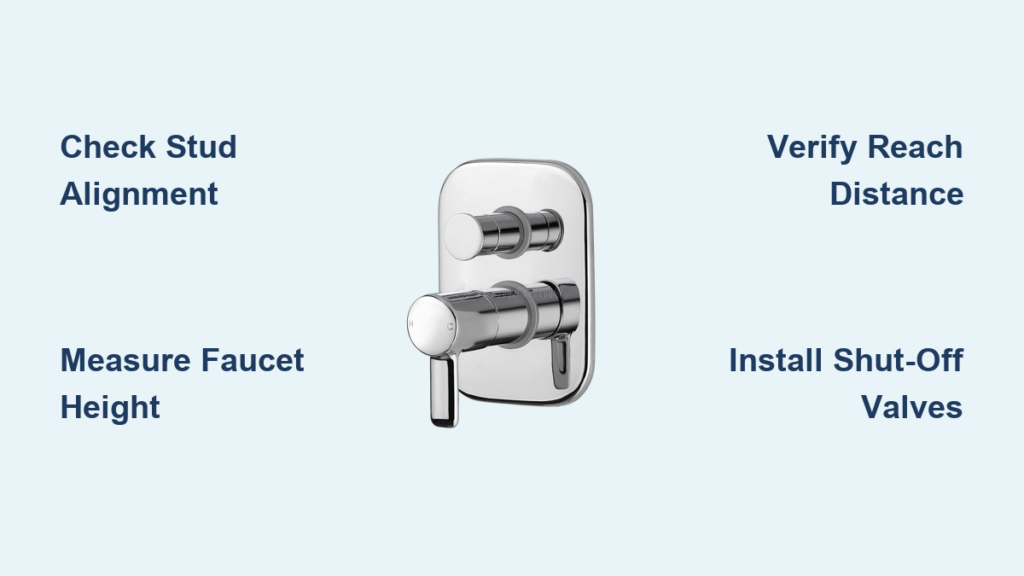
Verify Stud Alignment Before Cutting Into Your Wall

Wall-mount faucets anchor directly to wall studs, making stud positioning the foundation of your entire installation. Use a reliable stud finder to locate all studs in your installation area, marking their edges and centers clearly with pencil or painter’s tape. Standard stud spacing measures 16 inches on center, but older homes may have different spacing or irregular stud placement requiring adjustment. Mark every stud from floor to ceiling to understand the complete framing landscape before planning plumbing routes.
The faucet must install between two studs with adequate space for water supply lines, shut-off valves if desired, and any electronic components for touch-free models. Standard installation requires approximately 4 to 6 inches of horizontal clearance between studs, though your specific faucet model may require more or less space. Measure your planned mounting location carefully against manufacturer specifications, ensuring the faucet body, handles, and any mounting plates fit comfortably within the stud bay without interference.
Pro Tip: Before cutting any drywall, verify there are no electrical wires, ductwork, or other utilities running through your planned plumbing path. A stud finder with AC wire detection can save you from costly repairs later.
Calculate Perfect Faucet Height for Your Sink Configuration
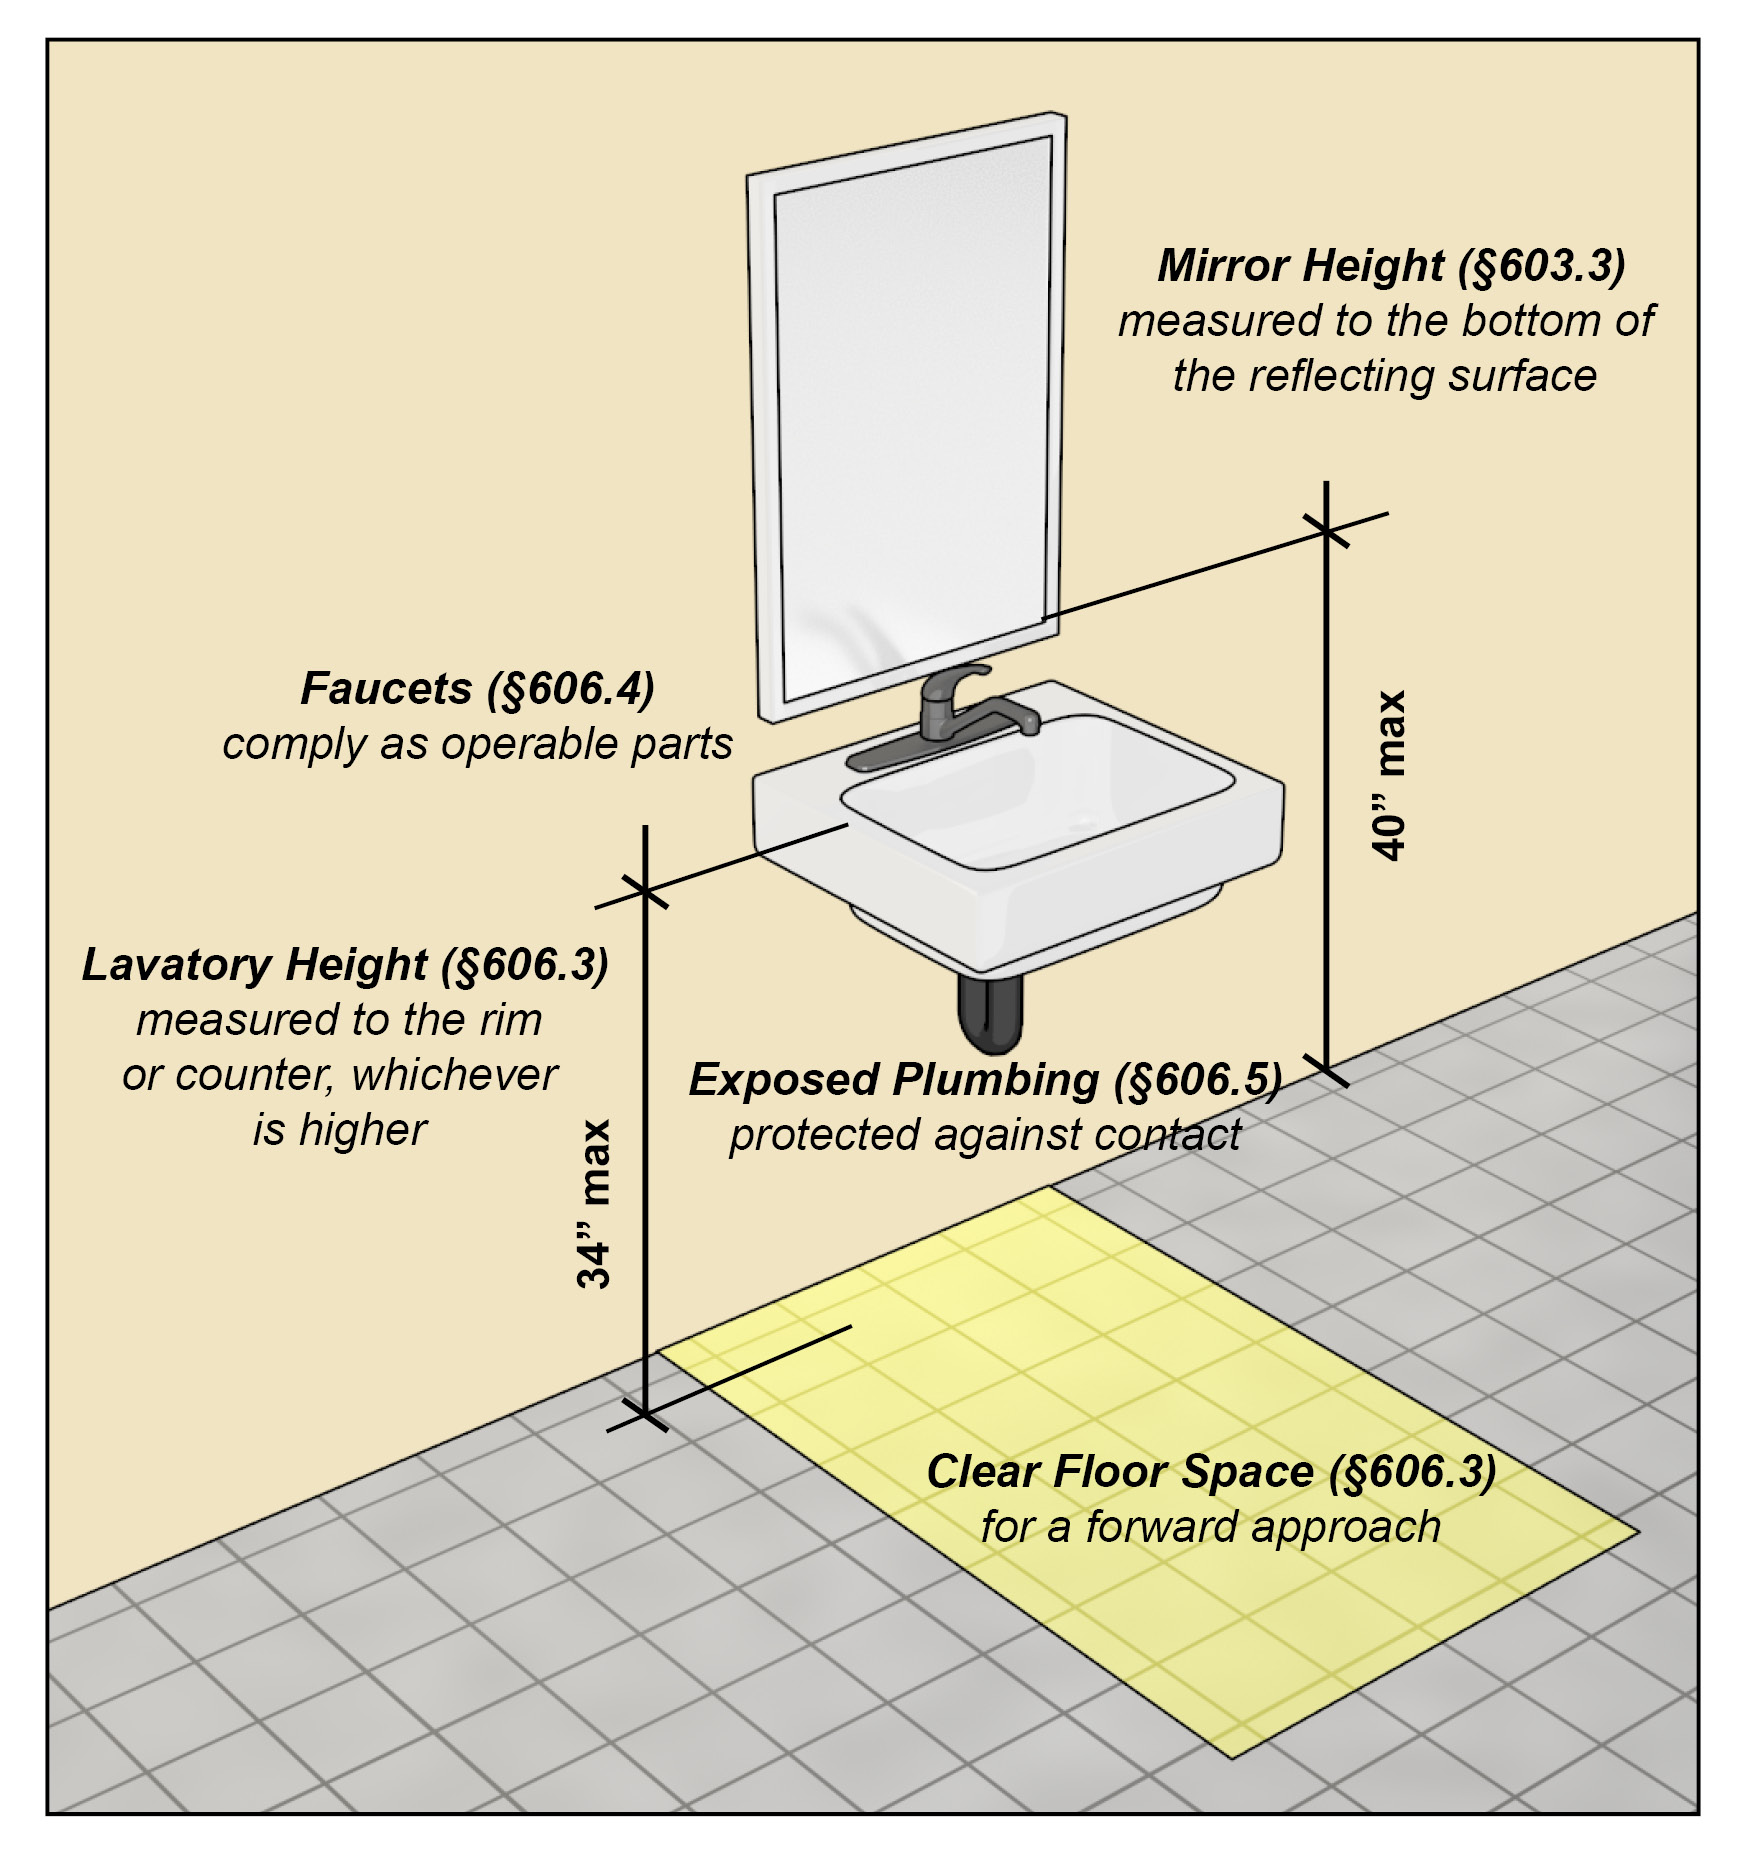
Faucet height significantly impacts daily functionality, water stream control, and splash prevention. Countertop height must comply with ADA standards specifying maximum 36-inch heights, though many residential installations range from 30 to 36 inches depending on user preferences and sink configurations. Your faucet height measures from the countertop surface upward, so coordinate this measurement carefully with your countertop specification and planned sink thickness.
The optimal faucet height balances two competing concerns: clearance for hand washing and sink use, versus control of the water stream to minimize splashing. A faucet positioned too high creates a long vertical drop for water, increasing splash potential onto walls, floors, and users. A faucet positioned too low restricts sink usability and may interfere with larger items requiring washing. Most installers recommend positioning the spout so its lowest point sits 4 to 6 inches above the sink basin rim, though your specific situation may require adjustment based on sink depth and faucet design.
Consider who will use the faucet most frequently when determining height. Households with children may benefit from slightly lower installations improving accessibility for young users, while primarily adult households might optimize for adult ergonomics. Some premium wall-mount systems incorporate height-adjustable mounting frames that allow fine-tuning during and after installation.
Measure Precise Reach Requirements for Your Sink
Wall-mount faucets extend from the wall and sit farther back from the sink basin than deck-mount alternatives, often by several inches. Reach—the horizontal distance from the wall to the faucet spout output—determines how comfortably users can access water and whether the stream lands properly in the sink basin. Short reaches may frustrate users with shorter arms or when paired with deep sinks, while excessive reaches create awkward angles and increased splash potential.
Most wall-mount faucets range from 6 to 12 inches in reach, with options across this spectrum accommodating various sink configurations. Measure your sink depth from the wall to its front edge, then add 2 to 4 inches to determine your minimum suitable reach. This calculation ensures the faucet stream lands in the basin center rather than hitting the near sink wall or falling short into empty space. When measuring, account for any backsplash thickness that reduces effective wall space behind the sink.
Critical Mistake to Avoid: Never install a wall-mount faucet without first measuring your sink’s exact dimensions. A reach that’s too short forces users to contort their hands to get under the water stream, while excessive reach creates splash problems that require faucet replacement.
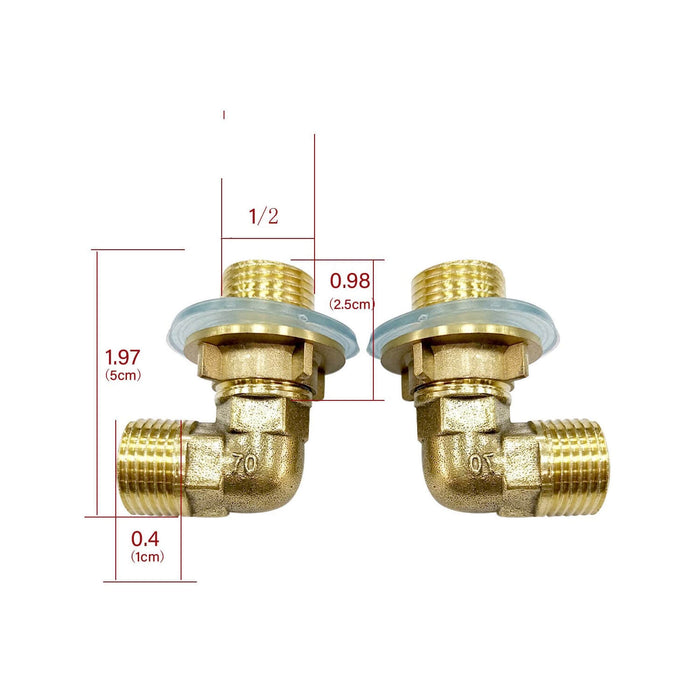
Install Accessible Shut-Off Valves Before Wall Closure
Shut-off valves provide essential functionality for wall-mount faucet installations despite the apparent logic that wall leaks would require opening the wall regardless. Valves allow you to isolate water supply to the faucet specifically, enabling maintenance, repair, or component replacement without shutting off water to the entire house. This convenience proves invaluable during routine cartridge replacements, aerator cleanings, or unexpected leaks when immediate shut-off prevents water damage.
Install shut-off valves in accessible locations such as vanity cabinets, basement access areas, or behind removable access panels. Valve placement should allow easy operation without requiring tools or difficult positioning, as emergency shut-off situations rarely occur during convenient moments. If installing in a vanity cabinet, position valves where they’re visible and reachable without removing stored items. Access panels should open easily and not require hardware removal for operation.
Run water supply lines from your shut-off valves through the wall cavity to the faucet mounting location. Use appropriate pipe materials meeting local building codes—typically copper, PEX, or CPVC depending on jurisdictional requirements and installer preference. Supply lines should terminate at the correct height and horizontal position for your specific faucet model, with enough excess length for comfortable connection to faucet inlet fittings.
Secure Mounting Hardware with Proper Wall Support
With plumbing complete and wall surfaces ready for finishing, install the faucet mounting hardware according to manufacturer specifications. Most wall-mount faucets include a mounting plate or bracket that secures to blocking or directly to studs within the wall. This plate distributes the faucet’s weight and operational forces across a broad area, preventing loosening or failure over time. Ensure the mounting plate sits perfectly level—any deviation shows clearly in the finished installation and may affect handle operation or water flow direction.
Attach the mounting plate using the hardware provided, driving screws into studs or blocking at specified locations. Some systems use adjustable mounting frames that allow height and horizontal positioning tweaks after initial attachment, which proves valuable for achieving perfect alignment with sinks and backsplashes. If your system includes these adjustment features, leave mounting screws slightly loose until you’ve verified final positioning, then tighten fully once satisfied with alignment.
Pro Tip: Before securing the mounting hardware permanently, temporarily attach the faucet body to verify alignment with your sink. This step prevents costly rework after drywall installation.
Connect Water Lines and Test for Hidden Leaks
With the faucet body mounted securely, connect water supply lines from the wall termination points to the faucet inlet fittings. Most wall-mount faucets use standard 3/8-inch or 1/2-inch compression fittings, though your specific model may use different connection types. Apply thread sealant tape to all threaded connections, wrapping clockwise around male threads two to three times for secure, leak-free seals. Hand-tighten connections first, then use wrenches to snug fittings without over-tightening, which can damage brass fittings or crush washers.
Before completing the installation, test all connections thoroughly for leaks and verify proper faucet functionality. Turn on water supply at shut-off valves slowly, allowing pressure to build gradually while watching for any visible leaks at connection points. Increase water flow gradually to full operation, checking for leaks at supply line connections, faucet inlet fittings, and any accessible plumbing within the wall cavity.
Test both hot and cold water functions independently, verifying correct handle operation and temperature adjustment ranges. Check that the water stream emerges from the spout center and lands properly in the sink basin without excessive splashing. If splash issues occur, they may indicate incorrect faucet height or reach requiring adjustment, or may resolve with a different aerator installation.
Implement Smart Maintenance Practices for Longevity
Wall-mount faucets require different maintenance approaches than accessible deck-mount alternatives since their plumbing hides within wall cavities. Schedule periodic inspections of accessible connections, checking for moisture signs that might indicate developing leaks within the wall. Clean aerators regularly to maintain water flow and prevent mineral buildup that affects stream quality.
Protect your investment by selecting quality components from reputable manufacturers and purchasing replacement parts before needed. Solid brass construction resists corrosion and wear far better than cheaper alternatives, justifying higher initial costs through extended service life. Keep manufacturer documentation, warranty information, and part numbers accessible for future reference.
Final Tip: When learning how to install a wall mounted faucet, always purchase from dealers who supply replacement parts. Wall-mounted systems inevitably require maintenance, and having access to replacement components prevents the headache of matching discontinued models years later. With proper installation and regular maintenance, your wall mounted faucet provides reliable service and contemporary aesthetics for many years of daily use.

