

You’ve stared at that blank concrete wall, frustrated that hanging a simple shelf or mounting a heavy TV bracket feels impossible. Standard drywall anchors crumble instantly against concrete’s density, leaving ugly holes and failed projects. But here’s the good news: mounting into concrete isn’t rocket science—it just requires the right tools, techniques, and anchor types most DIYers overlook. In this guide, you’ll master concrete mounting in under 30 minutes using methods proven by contractors. Forget guesswork: we’ll cover exactly how to drill clean holes, choose anchors that won’t strip, and secure everything from light shelves to 200-pound TVs without cracking your wall.
Concrete mounting fails 80% of the time because people use the wrong drill bits or anchors. Masonry requires specialized hardware that grips concrete’s gritty composition—not just brute force. I’ve seen homeowners shatter walls trying to use standard twist bits or plastic anchors. The solution? A hammer drill with carbide-tipped bits and mechanical anchors that expand inside the concrete. By the end of this guide, you’ll know how to select anchors based on weight load, drill without overheating your bit, and avoid the #1 mistake that causes anchors to spin loose (it’s not what you think). Let’s turn that stubborn concrete wall into your most versatile mounting surface.
Why Standard Anchors Fail on Concrete Walls
Concrete’s hardness isn’t the real problem—it’s the material’s lack of “give.” Drywall anchors rely on compression in soft materials, but concrete won’t deform to grip them. Plastic anchors slip out instantly, while standard screws just spin in pre-drilled holes. Worse, using a regular drill press creates heat that glazes the hole, making anchors slide right out. You need mechanical anchors that physically lock into the concrete structure.
How Concrete Anchors Actually Work
Unlike drywall, concrete anchors don’t depend on wall material compression. They use one of two principles:
– Expansion force: Wedge anchors or sleeve anchors expand outward when tightened, pressing against the hole walls
– Thread grip: Concrete screws (like Tapcons) cut threads directly into the concrete as you drive them
The key is hole precision—a 1/16-inch oversized hole causes immediate failure. Always match bit diameter exactly to your anchor size.
Top 3 Anchor Types for Concrete Walls
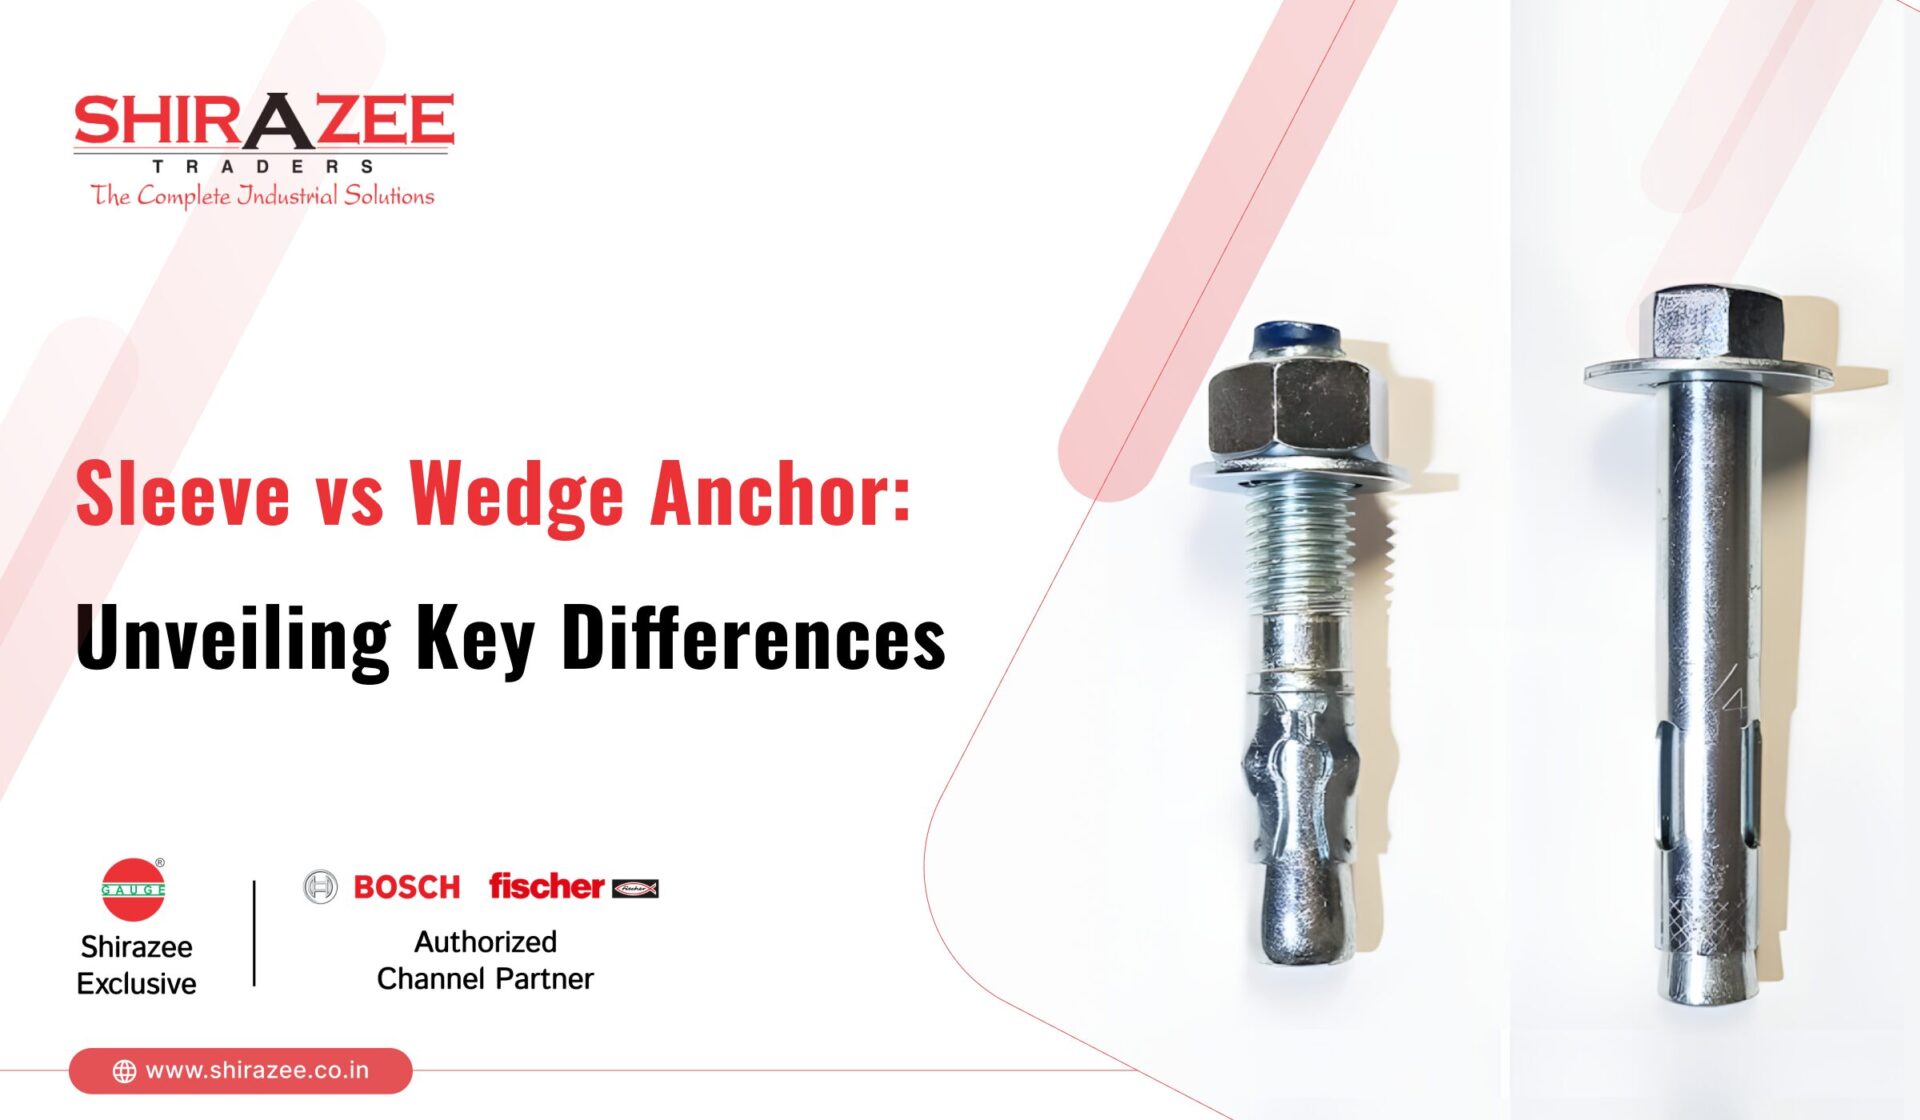
Wedge anchors (best for heavy loads >100 lbs): Steel rods with a expanding sleeve. Hammer into place, then tighten nut to wedge open. Ideal for structural mounts like TV brackets.
Concrete screws (best for medium loads 25-100 lbs): Blue-coated Tapcons self-tap threads. No hammering needed—just drill and screw. Perfect for shelves or conduit.
Sleeve anchors (best for variable hole sizes): Flexible sleeve expands when bolt is tightened. Use when hole depth is inconsistent. Avoid for overhead mounts.
Never use plastic anchors—they’ll pull out under 10 lbs of force.
Essential Tools for Flawless Concrete Drilling
Skip the corded hammer drill at your peril. Regular drills lack the percussive action to pulverize concrete without overheating. You’ll burn through bits and create cracked holes. Invest in these non-negotiable tools:
Must-Have Equipment Checklist
- Cordless hammer drill (18V minimum) with dedicated hammer mode
- Carbide-tipped masonry bits (size-matched to anchor diameter)
- Vacuum or shop vac (concrete dust clogs holes and damages tools)
- Center punch (prevents drill bit wandering)
- Depth gauge (masking tape on bit shaft marks exact depth)
Pro tip: Spray bits with water during drilling to reduce heat—concrete dust turns into mud, not airborne powder.
How to Choose the Right Drill Bit Size
Using a 3/16″ bit for a 1/4″ anchor is the #1 cause of mounting failure. Always:
1. Check your anchor’s specification sheet for required hole diameter
2. Buy bits labeled “SDS-plus” for hammer drills (standard twist bits shatter)
3. Size up by 1/64″ only for dusty conditions—never larger
Example: For 1/4″ wedge anchors, use a 1/4″ bit. For 5/16″ Tapcons, use 5/16″ bit.
Step-by-Step: Drilling Perfect Holes in Concrete
Drilling into concrete isn’t about pressure—it’s rhythm. Push too hard, and you’ll overheat the bit. Drill too fast, and the hole cracks. Follow this sequence:
How to Start Drilling Without Bit Slippage
- Mark your spot with painter’s tape to prevent bit skating
- Tap a dimple with a center punch at the exact mark
- Start at 50% speed with light pressure until hole is 1/4″ deep
- Engage full hammer mode only after the dimple is established
If the bit smokes or glazes (shiny surface), stop immediately—overheating ruins the hole.
Critical Hole Depth Guidelines
- Wedge anchors: Drill 1/2″ deeper than anchor length
- Concrete screws: Drill 1/4″ deeper than screw length
- Sleeve anchors: Match depth exactly to anchor length
Why? Debris collects at the bottom. Extra depth ensures full anchor expansion.
Installing Anchors Without Cracking the Wall
Most DIYers overtighten anchors, creating hairline cracks that spread under load. Concrete needs mechanical grip—not brute force. Here’s how to install safely:
How to Set Wedge Anchors Properly
- Brush hole with wire brush (vacuum first, then brush)
- Insert anchor until washer touches concrete
- Tighten only until resistance increases—then stop
- Never exceed 15 ft-lbs torque (hand-tight is usually enough)
Warning: If the anchor spins while tightening, the hole is oversized—start over.
Concrete Screw Installation Shortcut
- Drill hole to exact depth (use tape depth gauge)
- Vacuum hole thoroughly
- Drive screw at low speed (≤500 RPM) with impact driver
- Stop when head seats flush—do not overdrive
Pro tip: Blue Tapcons work in wet concrete. Red ones require dry holes.
Fixing Common Mounting Failures Immediately
Stripped holes and spinning anchors happen—but they’re reversible. Don’t patch and restart.
How to Rescue a Stripped Concrete Hole
- Vacuum debris from hole
- Inject epoxy anchor adhesive (like Simpson Strong-Tie)
- Insert a larger-diameter rod (e.g., 3/8″ rebar for a 1/4″ hole)
- Let cure 24 hours before remounting
Time-saver: For light loads (<25 lbs), use a plastic sleeve anchor in the stripped hole—works 90% of the time.
Why Your Mount Keeps Loosening (and How to Stop It)
Anchors spin loose when:
– Hole wasn’t vacuumed (dust prevents grip)
– Anchor is shorter than hole depth (no expansion space)
– Torque exceeded concrete’s shear strength
Fix: Remove anchor, drill 1″ deeper, and use epoxy-set rod.
Weight Capacity Rules You Can’t Ignore
Hanging a 50-pound mirror with undersized anchors risks catastrophic failure. Concrete strength varies wildly—your garage wall isn’t the same as a foundation.
Realistic Load Limits for Common Anchors
| Anchor Type | 1/4″ Size | 5/16″ Size | Critical Rule |
|---|---|---|---|
| Wedge Anchor | 850 lbs | 1,300 lbs | Must embed 1.5x anchor diameter |
| Concrete Screw | 240 lbs | 360 lbs | Requires 1″ minimum embedment |
| Sleeve Anchor | 600 lbs | 950 lbs | Never use in cracked concrete |
| Always derate by 50% for overhead mounts or seismic zones. |
How to Test Your Wall’s Actual Strength
- Drill test hole in inconspicuous area
- Install anchor and gradually add weight
- If cracks radiate >2″ from hole, switch to epoxy anchors
- For critical loads (TVs, cabinets), consult engineer
Preventing Future Mounting Disasters
Concrete mounting isn’t one-and-done. Seasonal temperature shifts cause expansion/contraction. Protect your mounts with these pro habits:
3 Maintenance Steps Every 6 Months
- Inspect for rust: Spray anchors with silicone lubricant if corrosion appears
- Check tightness: Retighten nuts only if play is detected (over-tightening cracks concrete)
- Seal gaps: Apply clear silicone caulk around mounts to block moisture intrusion
Critical: Never mount within 4″ of a wall edge—concrete can spall off.
When to Call a Professional
Skip DIY if:
– Mounting loads exceed 300 lbs
– Wall shows existing cracks or spalling
– You’re securing life-safety equipment (handrails, fire extinguishers)
Professionals use chemical anchors rated for 2,000+ lbs—worth the $150 service call.
Final Note: You now have the exact system contractors use to mount anything into concrete—no guesswork, no failed projects. Start with concrete screws for lightweight items (under 100 lbs) using a hammer drill at low speed, and always vacuum holes before anchor insertion. For heavy mounts, wedge anchors drilled 1/2″ deeper than anchor length deliver rock-solid holds. Remember the golden rule: hole precision beats brute force every time. If your first attempt fails, rescue it with epoxy and a steel rod instead of patching. Ready for more? Master hanging on brick walls next—same principles apply, but with different anchor types. Your concrete wall isn’t a limitation anymore; it’s your strongest mounting surface.

