
Mounting your Sony Bravia TV on a wall bracket transforms your viewing experience while freeing up valuable floor space. A properly installed wall-mounted TV creates a sleek, modern aesthetic and ensures your investment is secure for years to come. Whether you’re setting up a home theater or simply want to reclaim your entertainment center, this guide walks you through every step of the process, from gathering the right tools to making final adjustments. With careful planning and the right approach, most homeowners can complete this project in under two hours.
Before you begin, understanding your TV’s specifications and choosing the appropriate mounting hardware prevents costly mistakes. Sony Bravia TVs come with standardized mounting patterns, but selecting a bracket that matches your TV’s VESA measurements ensures a perfect fit. The wall mounting process requires attention to detail, proper tools, and a commitment to safety—especially when dealing with heavy electronics and wall structures. This comprehensive guide covers everything you need to know to mount your Sony Bravia TV confidently and correctly.
Gather Required Tools and Materials for Sony Bravia Wall Mounting
Successful TV mounting begins with assembling all necessary tools before starting. Having everything at your workstation prevents interruptions and ensures you complete the installation efficiently. The primary tools you’ll need include a power drill with various bits, a level to ensure straight alignment, a stud finder to locate wall framing members, and a screwdriver set with both Phillips and flathead options. You’ll also need a pencil for marking drill holes, a tape measure for precise spacing, and potentially a helper to assist with lifting and positioning the TV.
Beyond basic tools, specific mounting hardware determines your installation’s success. Your Sony Bravia TV requires a wall bracket compatible with its VESA pattern—typically 100x100mm, 200x200mm, 300x200mm, or 400x300mm depending on your TV size. The bracket package should include mounting screws, wall anchors appropriate for your wall type, and washers for distributing pressure. For drywall installations, you’ll need appropriate anchors rated for your TV’s weight; for stud walls, lag bolts that secure into the wooden framing provide the strongest hold. Consider cable management solutions like in-wall power kits or surface-mounted raceways to achieve a clean, professional appearance once your TV is mounted.
Check Your Sony Bravia TV’s VESA Pattern Before Mounting
Understanding your Sony Bravia’s mounting specifications prevents purchasing incompatible hardware and ensures safe installation. Every Sony Bravia TV model includes a VESA (Video Electronics Standards Association) pattern—a standardized measurement indicating where mounting screws attach to the back of the television. This pattern typically appears as a set of four threaded holes arranged in a square or rectangular pattern. Consulting your TV’s manual or measuring the distance between these mounting points confirms your VESA specification before purchasing any wall mount.
Sony Bravia TVs range from 32-inch to 85-inch screens, with corresponding VESA patterns that increase in size with the TV. Smaller models like 32-inch to 43-inch televisions usually feature 100x100mm or 200x100mm patterns, while larger 55-inch to 65-inch TVs commonly use 300x200mm or 300x300mm configurations. Flagship 75-inch and 85-inch models may require 400x300mm or 400x400mm patterns. Equally important is checking your TV’s weight against your wall bracket’s rated capacity—a bracket supporting 100 pounds safely holds a 65-pound TV with plenty of margin for secure mounting. Verifying these specifications before purchasing your mount prevents returns, delays, and potential damage to your television.
Locate Wall Studs for Secure Sony Bravia TV Installation
Finding solid wall studs creates the foundation for a safe, stable TV installation. Studs—vertical wooden framing members behind your drywall—provide the anchoring points necessary to support your TV’s weight and the forces exerted during normal viewing. Mounting directly into drywall without stud engagement risks the bracket pulling free, potentially causing your television to fall and sustain serious damage. A quality stud finder detects these framing members quickly, though you can also use the “knock and listen” method if you don’t have one available.
To locate studs effectively, run your stud finder across the wall in horizontal passes, marking each stud’s edge with a pencil. For accuracy, find two adjacent studs and measure the distance between them—standard residential construction typically spaces studs 16 or 24 inches apart on center. Once you’ve identified suitable stud locations, mark them clearly and verify with multiple passes. If your desired mounting position falls between studs or doesn’t align with enough solid anchoring points, you may need to adjust your bracket location or consider a different wall. Some mounting situations require cutting into the drywall to attach a mounting board across multiple studs, creating a solid backing for your bracket regardless of stud spacing.
Attach Wall Plate to Wall for Sony Bravia TV Mounting

The wall plate forms the solid foundation connecting your TV to the wall structure, requiring precise installation for successful mounting. Begin by holding the wall plate against your marked position, using your level to ensure it’s perfectly horizontal before marking your drill hole locations. Most wall plates require four to six mounting points distributed across the plate’s length—every mounting hole should align with a stud or use appropriate wall anchors rated for your TV’s weight.
Drill pilot holes at your marked locations using a bit slightly smaller than your mounting screws. For stud mounting, drill holes sized for your lag bolts, typically 1/8-inch for 3/8-inch lag screws. If mounting into drywall without stud access, drill holes sized for your wall anchors and install them before proceeding. Position the wall plate over your holes, insert mounting screws or bolts, and tighten them gradually in an alternating pattern—this prevents the plate from shifting and ensures even pressure distribution. For heavy TVs, use washers under screw heads to prevent pulling through the wall plate material. Once secure, test the wall plate by attempting to wiggle it—an solidly mounted plate shows no movement whatsoever.
Prepare Your Sony Bravia TV for Wall Bracket Attachment

Attaching mounting arms or rails to your Sony Bravia TV requires careful handling to avoid damaging the delicate electronics. Before touching your television, ensure you have a clean, soft surface like a blanket or cardboard to protect the screen and cabinet. Never place the TV face-down, as this risks screen damage and places stress on the internal components. Having a second person assist with this step makes the process safer and reduces the risk of dropping or mishandling the television.
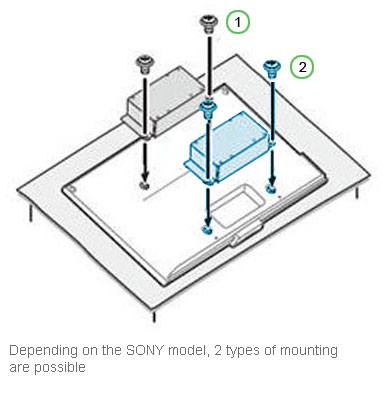
Locate the VESA mounting holes on the back of your Sony Bravia—these typically appear as four threaded holes arranged in a square pattern. Remove any protective covers from these holes and inspect them for debris. Attach your TV’s mounting arms or dedicated mounting bracket using the screws provided with your wall mount kit; these screws are specifically designed to match your TV’s thread specifications. Standard Sony Bravia mounting screws typically range from M4 to M8 in diameter, with lengths between 10mm and 20mm depending on your TV model. Avoid over-tightening these screws, which can crack the TV’s rear housing or strip the mounting holes—tighten until snug, then give them a final quarter-turn with a screwdriver. Some mounts include spacers or washers that must be installed between the TV and mounting arms to accommodate specific TV designs; consult your mount’s instructions for guidance.
Mount Sony Bravia TV on Wall Bracket Safely
With the wall plate installed and the TV prepared, you’re ready for the critical step of joining these components. This step requires at least two people—one to hold the TV steady while another guides it onto the wall mount. Before lifting, confirm that any tilting mechanisms on your wall mount are in the correct position and that the mounting arms on the TV will align properly with the wall plate. Having a helper maintain stability throughout this process prevents drops, injuries, and expensive damage.
Carefully lift the TV, positioning the mounting arms so they overlap with the wall plate’s attachment points. Most wall mounts use a hook-and-slot system where you lower the TV arms onto corresponding plate hooks, though some use locking mechanisms that require specific alignment. Once the TV feels supported, check for proper engagement by gently trying to lift the TV away from the wall—it should remain firmly attached without any play or wobbling. Engage any locking mechanisms according to your mount’s instructions, and verify that the TV sits flush against the wall plate. This is also the time to make any necessary adjustments to achieve perfect horizontal alignment before tightening all mounting hardware permanently.
Adjust Viewing Angle on Your Mounted Sony Bravia TV
Fine-tuning your mounted TV ensures optimal viewing angles and a professional appearance. Begin by checking levelness using a spirit level placed across the top of your television—small adjustments often require loosening the mounting arm bolts slightly, repositioning, and re-tightening. Most wall mounts include adjustment mechanisms allowing tilt and sometimes swivel adjustments even after installation. For viewing comfort, tilt your TV downward slightly if mounting above eye level, or upward if seated below the mount height.
Sony Bravia TVs feature internal sensors that can detect orientation, so ensure your TV isn’t mounted at an extreme angle that might confuse these systems. If your mount includes cable management features, route your power and HDMI cables through the designated channels before finalizing adjustments. Test the full range of motion on tilting and swiveling mounts to ensure cables don’t bind or stress during movement. Once you’re satisfied with the TV’s position, tighten all adjustment mechanisms according to the manufacturer’s specifications—loose mounting hardware causes annoying TV movement when bumped and poses long-term stability risks.
Conceal Cables on Your Wall-Mounted Sony Bravia TV
Professional cable management transforms your wall-mounted TV from a functional installation into a polished entertainment centerpiece. Exposed cables detract from the clean aesthetic and accumulate dust, making cleaning difficult. Several approaches exist for concealing connections, ranging from simple surface-mounted raceways to more involved in-wall installations that require electrical-rated components and careful planning.
Surface-mounted cable management systems offer the simplest solution, consisting of adhesive-backed channels that mount directly to your wall surface. These systems accept multiple cables and paintable covers that blend with your wall color. For a more permanent solution, in-wall cable management kits route cables through the wall cavity, exiting near your TV and at floor level for connection to components. This approach requires cutting drywall, installing low-voltage brackets, and careful cable routing—but produces the cleanest result. Regardless of your chosen method, label cable ends before routing to simplify reconnections, and leave sufficient slack at both ends to accommodate future adjustments. Ensure all cables are rated for in-wall use if routing through wall cavities, and never route power cables through the same opening as low-voltage connections like HDMI or antenna cables.
Verify Your Sony Bravia TV Mount Installation Security
Verifying your mount’s security protects your investment and ensures safe long-term operation. Begin with a visual inspection, checking that all mounting bolts are properly tightened and that the TV shows no signs of tilting or separation from the wall plate. Test each mounting point by gently pushing against the TV’s corners—any movement indicates insufficient tightening or improper installation that requires immediate attention.
Perform a “stress test” by gently pulling the TV away from the wall in various locations to confirm all attachment points are secure. Check wall plate mounting by attempting to wiggle the plate at each bolt location; any movement suggests the bolt isn’t properly engaged with a stud or that wall anchors have failed. Verify that your wall structure shows no signs of stress around mounting points, including cracks in drywall or separating trim. Test all tilt and swivel functions to ensure cables move freely without binding. Finally, confirm your TV powers on normally and that all connections to external devices function properly—HDMI ports, audio outputs, and network connections should all respond as expected.

