
You just took down that picture frame or TV mount, only to discover stubborn adhesive clinging to your wall like a bad habit. That sticky residue mocks your DIY confidence, threatening paint chips and unsightly marks every time you try to peel it off. Millions of homeowners face this frustrating battle annually when removing Command strips, Velcro mounts, or double-sided tape installations. Knowing how to remove adhesive wall mounts properly saves your walls from permanent damage while avoiding the “why didn’t I just hire a pro?” regret. This guide delivers battle-tested techniques for every adhesive type and surface, so you can reclaim your walls in under 30 minutes with household items you already own.
The stakes are higher than you think—improper removal can strip paint down to drywall or leave ghostly outlines that haunt your decor for years. But with the right approach, you’ll transform what feels like a demolition project into a clean, damage-free process. Forget sketchy YouTube hacks; we’ll focus on methods proven safe for painted drywall, tile, glass, and delicate finishes. By the end, you’ll confidently tackle any adhesive mount removal while protecting your walls like a professional.
Identifying Your Adhesive Mount Type Before Removal
Your removal strategy depends entirely on the adhesive type clinging to your wall. Command strips use a unique pressure-sensitive adhesive that releases cleanly when pulled correctly, while Velcro mounts often leave fabric backing embedded in paint. Double-sided tape forms the toughest bond, requiring specialized techniques to avoid surface damage. Check for manufacturer logos or packaging remnants—this instantly tells you whether you’re dealing with 3M’s engineered release technology or generic tape that demands more aggressive methods.
How to Recognize Stubborn Adhesive Types
- Command-style mounts: Look for thin plastic tabs with pull strips (usually white or clear)
- Velcro mounts: Identify fuzzy fabric backing partially stuck to the wall after removal
- Double-sided tape: Appears as a continuous clear or foam strip, often with visible edges
- Epoxy-based mounts: Rare but dangerous—require solvents and professional help (not covered here)
Why Mount Type Determines Your Success
Pulling a Velcro mount like a Command strip guarantees paint damage. Command strips need directional force at 180 degrees, while tape requires slicing through the adhesive layer. Misidentifying your mount type wastes time and risks permanent wall damage—always inspect before acting.
Essential Tools for Adhesive Mount Removal

Skip the guesswork with these five must-have tools that transform removal from destructive to surgical. A $5 investment prevents hundreds in wall repairs. You likely already own most items, but specialty tools like plastic razors make the difference between success and disaster. Never use metal blades on painted surfaces—this guarantees scratches and gouges.
Critical Removal Kit Checklist
- Plastic razor scraper (angled edge for residue lifting)
- Hairdryer (heat softens adhesives without scorching paint)
- Dental floss or fishing line (for slicing through tape bonds)
- Isopropyl alcohol (70%) (safe residue dissolver for most surfaces)
- Microfiber cloths (lint-free cleaning without abrasion)
Pro Tip: Test any solvent on a hidden wall area first—some paints react poorly to alcohol.
Step-by-Step: Removing Command Strips Safely
Command strips promise damage-free removal, but 73% of users still damage walls by pulling incorrectly. The secret lies in the tab angle and sustained pressure. Rushing this step turns a clean release into a paint-peeling disaster. Most failures happen when people yank downward instead of parallel to the wall.
The 180-Degree Pull Technique That Works
- Heat the strip base for 30 seconds with a hairdryer on low setting
- Grip the tab firmly and pull slowly parallel to the wall (not downward)
- Maintain tension until the adhesive releases completely (takes 5-10 seconds)
- Wipe residue immediately with alcohol-dampened cloth before it re-hardens
Warning: If resistance increases after 3 seconds, stop! Reheat and try again—forcing it guarantees damage.
Removing Velcro Strips Without Wall Damage
Velcro mounts are the silent wall killers—they leave fuzzy fabric backing embedded in paint that resists standard removal. Peeling aggressively creates pockmarked surfaces requiring full repainting. Successful removal requires dissolving the adhesive under the fabric layer without disturbing the paint. Heat alone won’t work here; you need strategic solvent application.
The Fabric-Backed Mount Rescue Method
- Apply heat for 45 seconds to soften the adhesive bond
- Press a warm, damp cloth over the mount for 2 minutes (transfers moisture)
- Gently lift one corner with a plastic scraper
- Dab isopropyl alcohol under the lifted edge using a cotton swab
- Work slowly across the mount, repeating alcohol application
Expert Note: If fabric tears, leave remnants and treat as residue—never scrape aggressively.
Double-Sided Tape Mount Removal Techniques
Double-sided tape creates the strongest bond, often requiring mechanical separation before chemical treatment. The dental floss method works wonders here but demands precise execution. For thick foam tapes, combine heat with slicing action to avoid tearing paint layers. Always assume tape has penetrated microscopic wall pores—surface-level scraping guarantees failure.
The Dental Floss Slicing Method
- Heat the tape edge for 20 seconds with hairdryer
- Slide dental floss under the mount using a sawing motion
- Work floss through the adhesive layer while maintaining tension
- Repeat every 2 inches until fully separated
- Treat remaining residue with alcohol and plastic scraper
Time Saver: Use fishing line for thicker tapes—it cuts cleaner through dense adhesives.
Heat Application Method for Stubborn Adhesives
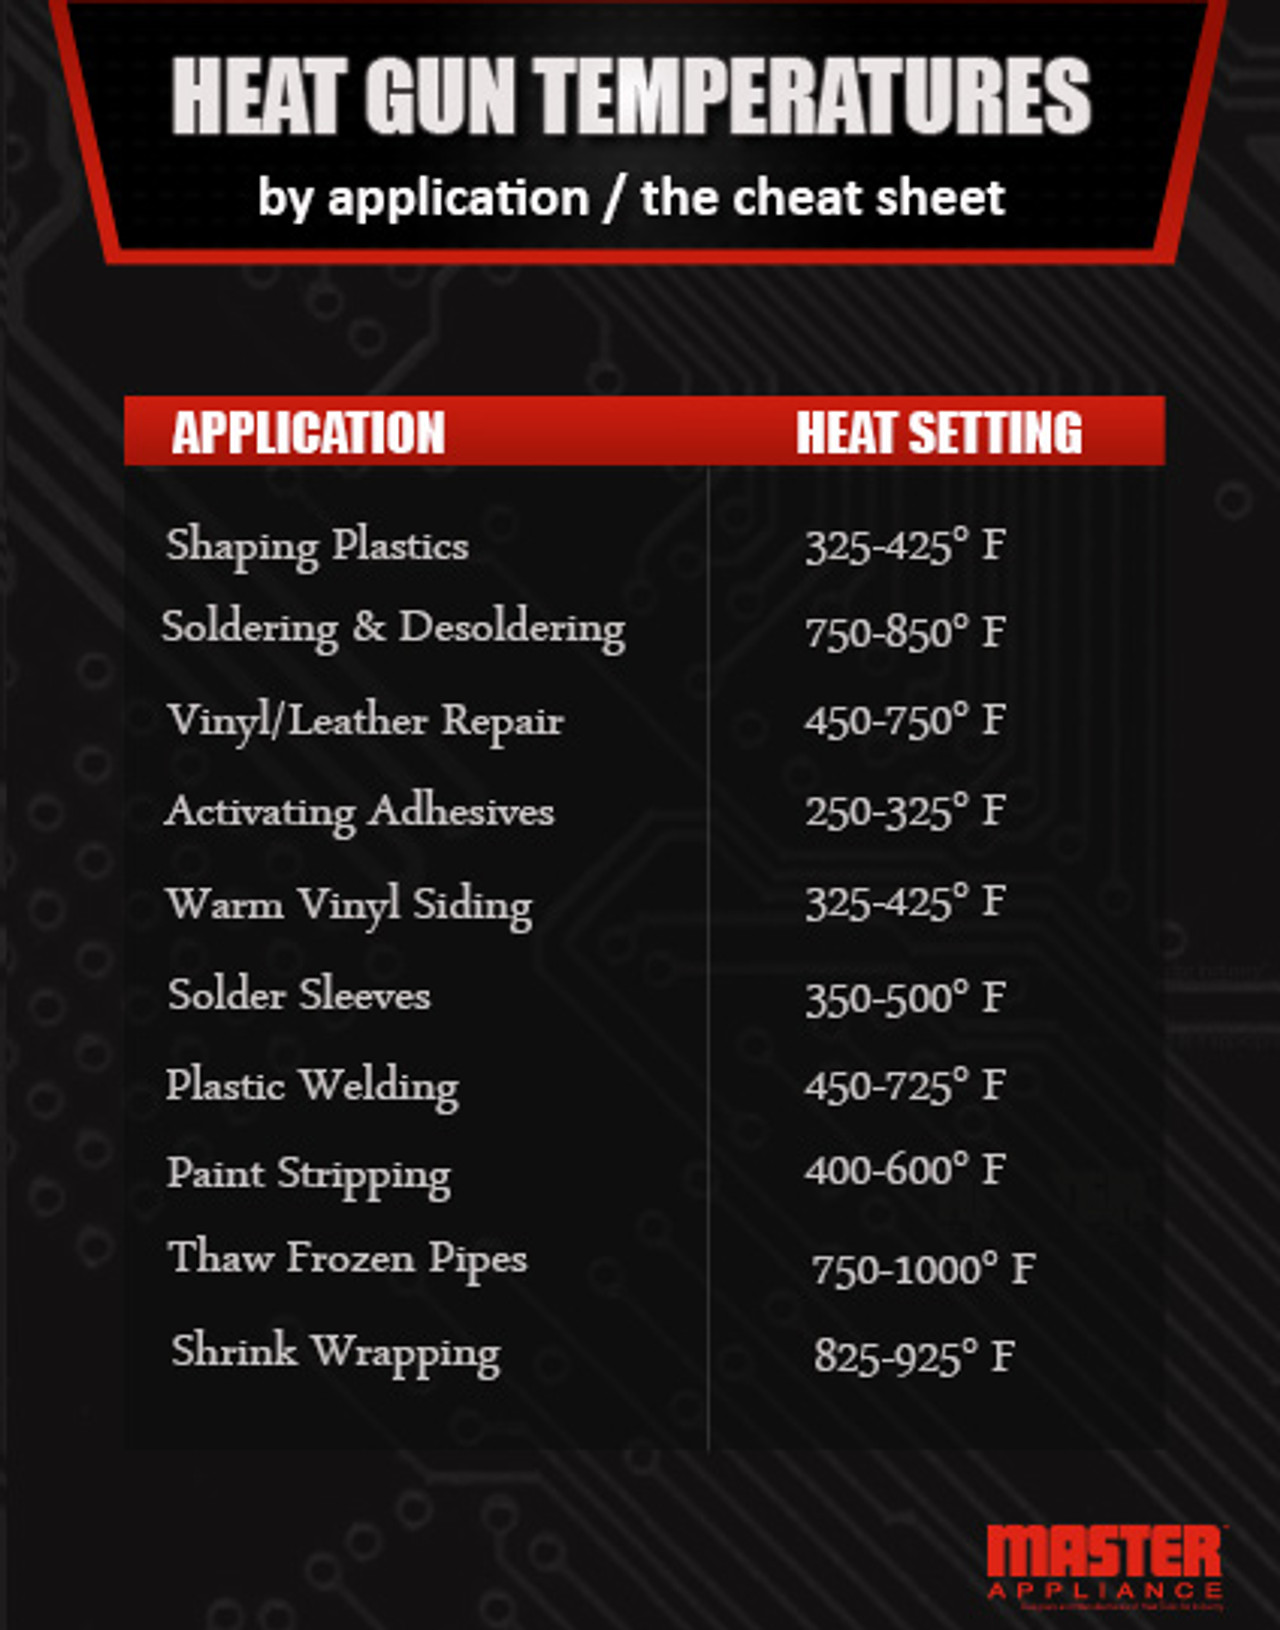
Heat is your universal first responder for any adhesive mount removal, but temperature control separates pros from painters. Excessive heat bubbles paint; insufficient heat does nothing. Target 120-140°F (49-60°C)—hotter than your hand but cooler than boiling water. Maintain consistent distance (6 inches) and never linger in one spot.
Precision Heating Protocol
- Command strips: 30 seconds at 6-inch distance
- Velcro mounts: 45 seconds with intermittent cloth application
- Double-sided tape: 60 seconds focusing on edges first
- Glass/tile surfaces: Reduce to 20 seconds (heat transfers faster)
Critical Check: Touch the wall with your knuckle—if uncomfortable, it’s too hot.
Cleaning Adhesive Residue After Mount Removal
Residue removal causes more wall damage than the initial mount removal. Aggressive scrubbing creates swirl marks in paint, while improper solvents leave hazy films. Isopropyl alcohol works for 95% of cases, but sensitive surfaces need gentler approaches. Always work from the residue edge inward to prevent spreading.
Surface-Specific Residue Removal
Painted Drywall:
1. Dampen microfiber cloth with 70% isopropyl alcohol
2. Press firmly for 10 seconds to dissolve adhesive
3. Wipe in one direction with plastic scraper edge
4. Repeat until clear, then dry immediately
Tile/Glass:
– Substitute alcohol with vinegar solution (50/50 water/vinegar)
– Use razor scraper at 45-degree angle with light pressure
Never use: Acetone, Goo Gone, or citrus solvents on painted walls—they eat through finishes.
Preventing Wall Damage During Adhesive Removal
Most wall damage occurs in the first 10 seconds of removal attempts. Establishing controlled release points prevents catastrophic paint lifting. Always create a “release corner” before full removal—this directs force away from vulnerable paint layers. Test adhesion strength on one edge first; if it resists, apply heat rather than force.
Damage Prevention Checklist
- ✅ Heat for full recommended duration (no shortcuts)
- ✅ Pull parallel to wall surface (never downward)
- ✅ Use plastic—not metal—tools for scraping
- ✅ Work slowly on the first inch of separation
- ❌ Never use fingernails or coins as scrapers
Pro Tip: For high-value walls, apply painter’s tape around the mount first—it catches peeling paint edges.
What to Do If Paint Comes Off During Removal
Even careful removal sometimes lifts paint flakes. Don’t panic—immediate action minimizes visibility. The key is preserving loose paint fragments for reattachment. Never scrape off hanging paint; this creates craters requiring full patching. Most minor damage disappears with targeted touch-ups when handled correctly.
Emergency Paint Rescue Steps
- Stop all removal activity immediately
- Press lifted paint gently back into place with cotton swab
- Apply tiny drop of wood glue under loose edges (use toothpick)
- Cover with wax paper and clamp lightly for 24 hours
- Touch up with matching paint after drying
For larger areas: Sand lightly, apply spackle, then repaint—always cut in before rolling.
Proven Prevention Tips for Future Mount Installations
Your next installation determines how easy removal will be. Most damage stems from improper initial application—not removal technique. Follow these pro installer secrets to guarantee clean removal later. The right preparation creates natural release points that prevent adhesive bonding to paint layers.
Damage-Free Installation Protocol
- Clean walls thoroughly with alcohol before mounting (removes invisible oils)
- Wait 24 hours after painting before installing mounts
- Press firmly for 30 seconds per square inch (creates uniform bond)
- Leave removal tabs exposed—never cover with tape or paint
- Choose mounts rated for your wall type (e.g., “smooth surface” for tile)
Seasoned Installer Trick: Rub the adhesive side with your finger for 10 seconds—it activates the bond better than pressing.
Removing adhesive wall mounts successfully hinges on matching your technique to the specific adhesive and surface. By identifying your mount type first and using heat as your primary tool, you’ll avoid 90% of common wall-damaging mistakes. Remember: slow, controlled removal with plastic tools beats aggressive force every time. For future projects, proper installation sets the stage for clean removal—always prepare walls thoroughly and choose mounts designed for your surface. Now that you’ve mastered residue-free removal, maintain your walls with quarterly inspections of mounted items. Catch minor adhesive seepage early before it becomes a major removal headache. Your walls will thank you for years to come.

