

You’ve just realized you need to detach your Dyson vacuum from its wall mount—maybe you’re moving homes, troubleshooting a charging issue, or simply need to store it elsewhere. But when you go to remove it, you hesitate, unsure of the proper technique. Forcing the wrong release mechanism can damage both your vacuum and the mounting hardware, potentially voiding your warranty. Understanding the correct removal process for your specific Dyson model is crucial for protecting your investment and avoiding unnecessary repair costs.
Before attempting any removal, recognize that Dyson vacuums across different product lines use distinct mounting systems. The removal procedure that works for a V10 might damage a Ball Animal model. Without model-specific guidance, you risk breaking the release mechanism or damaging electrical contacts. This guide explains the safest approach to removing your Dyson vacuum from its wall mount while highlighting when professional assistance becomes necessary.
Identify Your Specific Dyson Model First
Jumping straight into removal without confirming your vacuum model is the most common mistake Dyson owners make. Different mounting mechanisms require specific release techniques—what works for one model could damage another. Taking time to properly identify your vacuum prevents costly errors and ensures you follow the correct removal procedure.
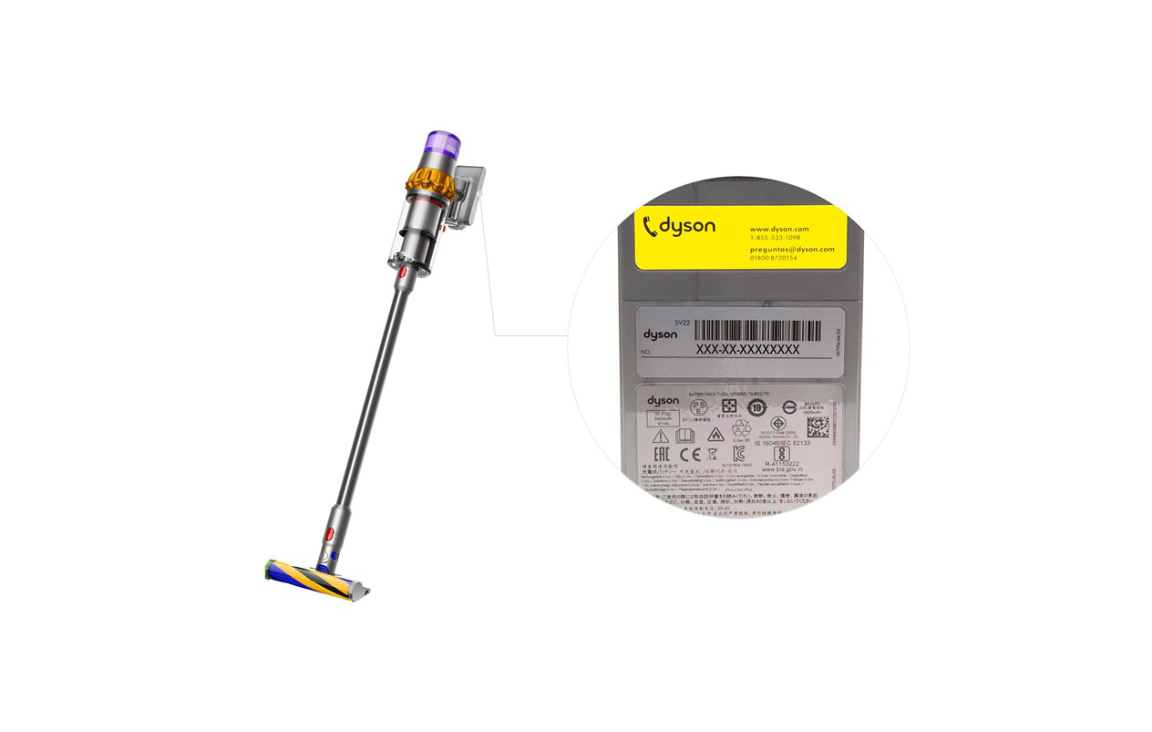
Locate your vacuum’s serial number, which typically appears on a label formatted as “123-AU-A12345” or “AB1-AU-A123456.” This label is usually found near the filter compartment, cyclone assembly, or on the vacuum body’s underside. The first three digits of this serial number are particularly important when contacting Dyson support, as they help technicians quickly identify your specific model variant.
Determine Your Mount Type
Dyson wall mounts fall into two primary categories: those included with your vacuum purchase and third-party or universal mounts. Genuine Dyson mounts feature specific release mechanisms designed for particular vacuum models, while aftermarket mounts often use different systems that require unique removal approaches.
Check for Dyson branding on your wall mount—official mounts typically display the Dyson logo and model-specific identification. If your mount lacks branding or appears different from images in Dyson’s official product catalog, you likely have a third-party mount. This distinction is critical because removal procedures for non-Dyson mounts won’t be covered by Dyson support and may require different techniques.
Contact Dyson Support for Model-Specific Guidance
https://www.dyson.com.au/support/contact-us
Rather than guessing at removal techniques that could damage your equipment, the most reliable solution is contacting Dyson’s official support team. They provide model-specific instructions that prevent damage and maintain your warranty coverage—something generic online advice cannot guarantee.
Dyson Australia offers dedicated customer support at 1800 239 766 during the following hours:
– Monday through Friday: 8:00 AM to 6:00 PM AEST
– Saturday: 8:00 AM to 5:00 PM AEST
When calling, have your serial number ready (particularly the first three digits), as support representatives use this to verify your product and access relevant documentation. Explain exactly what you’re trying to accomplish (“I need to remove my vacuum from the wall mount for relocation”) and describe any resistance or issues you’ve encountered during previous removal attempts.
Alternative Support Channels
If phone support isn’t convenient, Dyson provides multiple alternative contact methods that deliver the same model-specific guidance:
- Live chat: Accessible through the Dyson support website, this real-time text support connects you with experts who can walk you through removal steps while you’re standing at your mounted vacuum
- Facebook Messenger: Contact Dyson Australia through the official DysonAustralia page for text-based assistance
- PDF documentation: Download model-specific guides through the support portal that often include wall mount removal instructions
These channels prove especially valuable when you need visual confirmation of the release mechanism location or want to follow instructions step-by-step with an expert guiding you through the process.
Prepare for Safe Removal Procedure

Once you’ve obtained model-specific instructions from Dyson support, proper preparation prevents accidents and damage during the removal process. Even with correct technique, rushing through preparation can lead to dropped vacuums, damaged components, or electrical issues if your mount provides charging functionality.
Clear the area beneath and around your wall mount of any obstacles. Place a soft towel or cloth on the floor to cushion your vacuum if it accidentally slips during removal. Ensure you have adequate lighting to clearly see the release mechanism—many removal issues stem from simply not seeing the correct release point. If your mount is installed high on the wall, use a stable step stool to maintain proper footing and control during removal.
Gather Essential Information Before Starting
Before touching your vacuum, confirm these critical details from your Dyson support interaction:
- Exact location of the release mechanism (button, lever, or latch system)
- Whether you need to press one or multiple release points simultaneously
- Any electrical considerations if your mount provides charging
- Specific directional movement required (some models need slight downward pressure while releasing)
If Dyson support provided visual resources like PDF guides or video demonstrations, have these accessible during removal. Some models have subtle release points that blend with the mount’s design, making them difficult to identify without clear visual references.
Execute the Correct Removal Technique
With your model-specific instructions in hand and proper preparation complete, you’re ready to attempt removal. The precise technique varies significantly between models, but these universal principles apply to all Dyson wall mount systems:
Always support the vacuum’s full weight with one hand while operating the release mechanism with the other. Never assume the vacuum will stay securely attached once the release begins to disengage. For most models, you’ll need to apply steady, even pressure to the release point while simultaneously guiding the vacuum away from the mount—not yanking or jerking it free.
Handle Charging Mounts Safely
If your wall mount provides charging functionality, additional steps protect both you and your equipment:
- Check for charging indicator lights on your vacuum or mount
- Wait for the charging cycle to complete if possible
- Briefly press the power button to wake the vacuum before removal
- Gently pull the vacuum straight back from the mount once released
Never force removal while the vacuum shows active charging indicators. Some models enter a standby mode when mounted that makes the release mechanism less responsive—waking the vacuum first often resolves this issue.
Troubleshoot Common Removal Challenges
Even with proper technique, you might encounter resistance during removal. Before applying additional force, consider these common issues:
- Dust and debris buildup: Particulate matter around the release mechanism can cause stiffness. Use compressed air or a soft brush to clear obstructions before attempting removal again.
- Misidentified release point: Some mounts have multiple buttons—confirm you’re pressing the correct one for your model.
- Vacuum settled into mount: Over time, vacuums can become slightly “stuck” in the mount. Try gently rocking the vacuum side-to-side while maintaining release pressure.
If significant resistance persists after addressing these common issues, stop immediately. Forcing removal can break plastic components, damage electrical contacts, or compromise the mount’s structural integrity. The safest course is contacting Dyson support again with specific details about what’s happening during your removal attempts.
Maintain Your Wall Mount System After Removal
Once successfully removed, implement these maintenance practices to ensure smoother future installations and removals:
- Inspect the mount’s release mechanism for debris and clean with compressed air
- Check electrical contacts on both the mount and vacuum for corrosion or damage
- Periodically test the release mechanism’s operation (without removing the vacuum)
- Ensure the vacuum sits flush against the bracket when remounted
Vacuums in high-dust environments or those used daily benefit from monthly maintenance checks. If you notice increasing resistance during removal, address it promptly before the mechanism seizes completely.
When uncertainty arises about how to remove your Dyson vacuum from its wall mount, remember that Dyson’s support team exists specifically to provide the model-specific guidance you need. The 1800 239 766 support line connects you directly with experts who understand the precise release mechanisms for every Dyson model. Rather than risking damage through guesswork, take advantage of this resource to ensure your vacuum, mount, and warranty remain intact. With the right information in hand and proper preparation, removing your Dyson vacuum from its wall mount becomes a simple, safe process that protects your investment for years to come.

