
Removing a Sony TV from a wall mount requires precise steps that vary based on your specific mounting system. Whether you need to access ports behind your television, relocate the TV to another room, or replace your mounting hardware entirely, understanding the correct removal technique prevents costly damage and protects your safety. This guide delivers exactly what you need to know to safely detach any Sony television from its wall mount—no matter the size or configuration.
Wall-mounted televisions present unique challenges that floor-standing units don’t face. The combination of substantial weight—often exceeding 50 pounds for larger screens—and awkward dimensions means improper removal techniques can result in dropped televisions, damaged walls, or serious injuries. Before attempting to remove your Sony TV, assess your specific situation, gather the necessary tools, and enlist a capable assistant. The steps outlined here apply to all Sony TV models and most common wall mount configurations you’ll encounter.
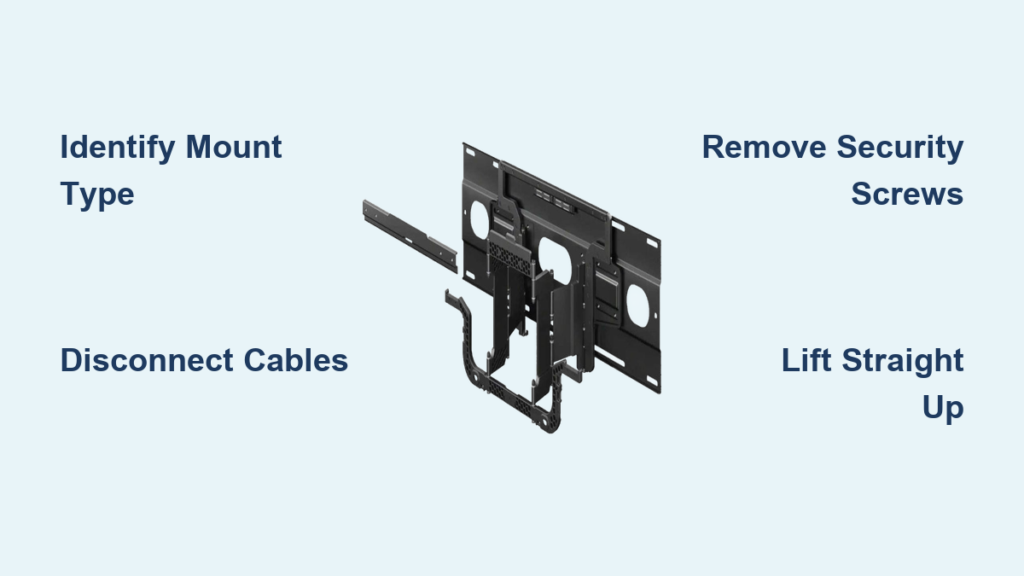
Identify Your Sony TV Wall Mount Configuration

Sony televisions use two primary wall mount types that determine your removal approach. Fixed or tilting mounts feature a metal plate attached to the TV back that hooks over a wall-mounted plate, with vertically-oriented security screws at the bottom holding everything together. These mounts offer maximum stability but minimal clearance behind your television, making hardware difficult to see without proper lighting. If your Sony TV sits flush against the wall with only slight upward or downward tilt capability, you’re dealing with this mount type.
Full-motion mounts incorporate an articulated armature extending from the wall, allowing you to pull the television forward and swing it side-to-side. The mounting plate on your Sony TV hooks over the end of this armature, secured by vertical security screws, downward-pulling hooks, or short horizontal security screws. The advantage becomes clear during removal—you can swing the TV outward for better access to mounting hardware rather than working blindly from beneath. If your television moves freely in multiple directions, you have this more versatile mount type.
Essential Tools Required for Sony TV Mount Removal

Gather these specific tools before attempting to remove your Sony television to ensure a smooth process:
- Long-handled Phillips screwdriver – Standard screwdrivers can’t reach security screws positioned behind your TV
- Complete Allen wrench set – Many Sony mounts use hex-head security screws requiring these tools
- Bright LED flashlight – Critical for illuminating the dark space behind and beneath your television
- Two sturdy ladders – Necessary for high-mounted TVs to provide stable access from both sides
- Blankets or moving pads – Protect your Sony TV from scratches when placing it down after removal
Arrange these tools within immediate reach before starting. Position your ladders securely on level ground, ensuring they extend several rungs above your working height. Place your blankets against the wall directly below the television where you’ll lower it after removal. This preparation prevents dangerous stretching motions and ensures you won’t fumble for tools while supporting heavy equipment.
Critical Safety Steps Before Removing Sony TV
Your safety depends on proper preparation—never attempt Sony TV removal alone. A 65-inch Sony television typically weighs over 50 pounds, while 75-inch models reach 75-85 pounds, and 85-inch units approach 100 pounds. These weights become exponentially more dangerous when combined with the awkward dimensions and balance challenges of flat-screen televisions.
Always follow these safety protocols:
- Enlist a capable second person who can support at least half the television’s weight
- Wear non-slip shoes with strong grip to prevent ladder accidents
- Clear the work area of all obstacles and tripping hazards
- Check for electrical hazards near where you’ll lower the television
- Position yourself for optimal control with feet shoulder-width apart on stable ladder rungs
If your Sony TV is mounted above a fireplace or in another challenging location, seriously consider professional assistance. The risk of injury or damage increases significantly with height—especially for larger screen sizes.
Remove Sony TV From Fixed or Tilting Mount in 5 Steps
Disconnect All Cables Before Starting
Begin by unplugging every cable connected to your Sony television. Remove power cords, HDMI cables, optical audio cables, and network connections before attempting removal. This prevents accidental damage to ports when lifting the television and eliminates tripping hazards once the TV is detached. Organize cables on the floor away from your work area so they won’t interfere with the removal process.
Locate Mounting Security Screws Underneath TV
Use your flashlight to examine the bottom edge of your Sony TV, looking for two downward-facing screw heads. These security screws are the primary mechanism holding your television to the wall plate. Most use Phillips heads, but some Sony mounts employ square or Torx heads requiring specialized tools. If you can’t find visible screws, your mount may use pull strings—thin cords that release the locking mechanism when pulled downward.
Remove Security Screws Completely
With your assistant supporting the television’s weight, carefully remove both security screws using the appropriate tool. Turn counter-clockwise while applying gentle downward pressure to prevent stripping the screw heads. Critical warning: Never leave one screw partially engaged—this creates dangerous binding that could cause sudden, uncontrolled movement when lifting.
Lift Sony TV Straight Up to Unhook Mounting Plate
Both you and your assistant should grasp opposite sides of the television and lift straight upward for 3-4 inches. This upward motion clears the mounting plate hooks from the wall plate ridge—a crucial step many DIYers miss. Continue lifting until you feel the television completely separate from the wall mount, then maintain firm control as you begin lowering it.
Lower TV to Prepared Surface Safely
Carefully move backward while lowering your Sony TV onto the blankets you positioned earlier. Keep the television close to the wall during descent to maintain control, and watch for any cables that might have fallen behind the unit. Once the TV rests securely on the protective surface, verify it’s stable before releasing your grip completely.
Detach Sony TV From Full-Motion Mount Efficiently
Swing TV Forward for Better Mount Access
The advantage of full-motion mounts becomes immediately apparent during removal. Pull your Sony TV away from the wall and swing it to one side, giving you direct side access to the mounting hardware instead of working from beneath. This repositioning often reveals security screws or pins that were previously hidden. Once positioned for access, disconnect all cables as you would with a fixed mount.
Identify Your Specific Mount Release Mechanism
Examine the connection between your Sony TV’s mounting plate and the wall armature. Full-motion mounts typically use one of three configurations:
– Vertical security screws facing downward
– Short horizontal screws entering from the side
– Pull pins that release with hand pressure
Most mounts use two fasteners, but some premium configurations may have additional security points. Take time to visually confirm your mount type before attempting removal.
Release Mounting Hardware Without Forcing
With your assistant supporting the television’s weight, carefully remove all security hardware using the appropriate tools. For stubborn screws, apply penetrating oil and wait 10 minutes before attempting removal—never force hardware as this risks damaging the mounting points. If your mount uses pull pins, grasp them firmly and pull straight outward with steady pressure until fully released.
Access Sony TV Ports Without Full Removal
Create Temporary Port Access on Fixed Mounts
If you only need to connect devices like soundbars to your Sony TV’s HDMI ports, consider accessing ports without full removal. For fixed mounts, tilt the bottom of your television outward to create a 2-3 inch gap. Use a camera flash or phone light behind the TV to locate ports, then insert cables using angled HDMI connectors designed for tight spaces. Pro tip: Attach a small mirror behind the TV to see port locations without straining.
Utilize Full-Motion Mount Flexibility for Easy Access
Full-motion mounts offer superior port access—simply swing your Sony TV outward and to the side for direct access to rear connections. This often provides enough clearance to plug in devices without any additional tools. For difficult-to-reach HDMI ports (like HDMI 1 with ARC functionality), use right-angle HDMI adapters that require minimal insertion depth.
When to Call Professionals for Sony TV Removal
Handle Large Sony TVs (75+ Inches) With Professional Help
Televisions 75 inches and larger present significant safety risks during removal. Their weight (75-100+ pounds) combined with awkward dimensions makes them extremely challenging to manage safely, especially when mounted high on walls. Professional media installers have specialized lifting equipment, proper techniques, and experience handling these large units without damage.
Seek Expert Assistance for Problematic Mounts
If your security screws are seized, stripped, or you cannot identify your mount’s release mechanism, professional help prevents costly mistakes. Attempting to force stuck hardware can damage your Sony TV’s mounting points or cause sudden, dangerous movement. A professional installer can assess your specific situation, use appropriate tools, and complete the removal safely—protecting your significant investment in premium Sony television equipment.

