
Your Milwaukee PACKOUT system shouldn’t stay confined to the floor—wall mounting these versatile containers creates instantly accessible tool storage that maximizes workspace efficiency while protecting your investment. Thousands of professionals have transformed cluttered garages and chaotic workshops into organized productivity hubs by strategically mounting their PACKOUT components, turning portable storage into permanent infrastructure. In this guide, you’ll discover proven Milwaukee PACKOUT wall mount ideas that solve common organization challenges, from vehicle installations that withstand road vibration to workshop configurations that follow your natural workflow patterns.
Milwaukee Large Wall Plate: Your Permanent Installation Foundation
The PACKOUT Large Wall Plate delivers professional-grade mounting that withstands daily workshop abuse while maintaining perfect alignment across multiple plates. Milwaukee’s Quick-Alignment Tabs eliminate frustrating measuring and adjustment when installing multiple plates in rows or columns—simply connect the tabs for consistent spacing that creates a polished professional appearance without specialized skills.
Weight Capacity Planning for Safe Installations
Shop installations support up to 150 pounds of stored equipment, but vehicle-mounted applications reduce this capacity to 75 pounds to account for vibration and dynamic loads. Never exceed these ratings—overloading causes premature failure, especially in vehicle applications where shifting loads create additional stress. For heavy toolboxes, distribute weight across multiple mounting points rather than concentrating load on single connection points.
Installation Sequence for Perfect Alignment
- Start at the bottom left corner of your planned configuration
- Secure the first plate with appropriate fasteners for your wall type
- Connect subsequent plates using the Quick-Alignment Tabs before final tightening
- Verify vertical and horizontal alignment before securing all fasteners
- Complete your grid pattern working outward from the initial installation point
Compact Plate Solutions for Tight Spaces
Half-width mounting plates solve space constraints where full-width plates would waste valuable wall real estate or create awkward configurations. These compact alternatives excel when creating column arrangements with alternating plate positioning or building focused storage stations for specific tool categories.
Tactical Placement for Task-Specific Zones
Create dedicated workstations by mounting half-width plates at strategic locations:
– Mount a single organizer above your workbench as a measurement station
– Position plates along back panels for frequently accessed tools
– Install compact plates at eye level for small parts organizers
– Reserve lower positions for heavy items requiring frequent access
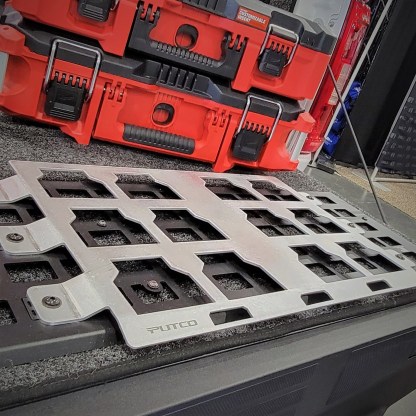
Third-Party Bracket Systems That Expand Mounting Options
The Joey Packout Front/Back Mount Bracket Kit (€64, 1,100+ reviews) transforms installation possibilities by enabling both front-facing and back-facing orientations. This flexibility proves invaluable when configuring tight spaces where standard mounting won’t accommodate workflow patterns or when creating specialized storage arrangements for oddly shaped tools.
Vehicle-Specific Mounting Solutions
Mobile professionals benefit from third-party brackets engineered for automotive vibration resistance. Look for kits with:
– Lock washers to prevent fastener loosening during transit
– Vibration-dampening materials between plate and mounting surface
– Thread-locking compound compatibility for permanent installations
– Quick-release mechanisms for temporary job site setups
Security-Enhanced Locking Mounts for Shared Workspaces
The Milwaukee Packout Locking Wall Mount by Unbeaten Path Designs adds critical security for shared workshops, commercial facilities, or job sites with multiple workers. This locking mechanism prevents unauthorized removal of mounted storage units while maintaining the PACKOUT system’s fundamental modularity—simply unlock when you need to move components.
When Security Mounts Make Sense
Install locking mounts in environments where:
– Multiple employees access shared tool collections
– Contractors share workspace with other trades
– Tools remain unattended overnight in accessible locations
– High-value specialty equipment requires extra protection
Garage Organization: Creating Efficient Wall-Mounted Stations
Transform your cluttered garage into an organized workshop by positioning workbenches beneath wall-mounted PACKOUT units. This configuration creates efficient workstations where tools remain immediately accessible during projects, minimizing unnecessary movement and keeping frequently used items within arm’s reach.
Strategic Height Placement Guide
| Height Zone | Recommended Contents | Access Frequency |
|---|---|---|
| Waist to Shoulder | Daily-use tools, frequently accessed items | High |
| Above Shoulder | Seasonal equipment, rarely used specialty tools | Low |
| Below Waist | Heavy loaded toolboxes, bulky items | Medium |
Workshop Floor-to-Ceiling Storage Walls

Commercial installations maximize vertical space with floor-to-ceiling wall plate coverage that organizes entire tool collections in one cohesive system. Electrical contractors create integrated stations for wire spools and testing equipment, while mechanical professionals organize around tool categories—each trade configures the system to match their specific workflow patterns.
Component-Specific Mounting Strategies
- Large Toolboxes: Mount at waist height for heavy power tools requiring frequent access
- Compact Organizers: Position at eye level for small parts and consumables
- Specialized Units: Dedicate zones for meters and sensitive equipment requiring individual protection
- Battery Stations: Create dedicated charging areas using specialized mounting adapters
Van Mounting: Optimizing PACKOUT in Service Vehicles

Van installations require specific considerations that differ from stationary workshop setups. The 75-pound vehicle weight capacity rating accounts for dynamic loads created by vibration, acceleration, and braking forces—never use shop installation ratings for mobile applications.
Critical Van Installation Steps
- Select mounting locations that don’t interfere with seatbelts or safety equipment
- Use automotive-grade fasteners with lock washers to prevent vibration loosening
- Apply thread-locking compound to all fasteners for permanent installations
- Position frequently accessed items within easy reach of the driver’s seat
- Secure PACKOUT units with supplemental restraints for severe-duty applications
Load Capacity Planning Mistakes to Avoid

Over 60% of PACKOUT wall mount failures result from exceeding weight capacity or improper load distribution. A loaded large toolbox weighing 30 pounds should distribute its weight across multiple mounting points rather than concentrating stress on a single connection.
Weight Distribution Best Practices
- Never mount heavy items on single plates—always span multiple mounting points
- Place heaviest items at lower positions where structural integrity is strongest
- Regularly inspect vehicle-mounted installations for fastener loosening
- Account for dynamic loads in mobile applications (add 20-30% safety margin)
Fastener Selection Guide for Different Wall Types
Successful PACKOUT wall installations begin with proper fastener selection based on your wall construction. Stud-based mounting provides the strongest connection for permanent installations, while hollow-wall anchors serve adequately for lighter loads when stud mounting isn’t practical.
Fastener Recommendations by Wall Type
- Wood Studs: 1/4″ x 2″ lag screws with minimum 1″ penetration
- Metal Studs: Toggle bolts rated for thin-wall metal framing
- Concrete/Masonry: Sleeve anchors rated for base material
- Drywall Only: Snap-toggle anchors for loads under 50 pounds
Future-Proofing Your PACKOUT Wall System
Effective installations plan for both current requirements and anticipated future needs. Take inventory of your entire tool collection, analyze access frequency patterns, and reserve expansion space for future acquisitions—this prevents costly reconfiguration later when your system grows.
Expansion Planning Checklist
- Leave space between current and planned future plates
- Install plates in grid patterns that allow horizontal and vertical expansion
- Document your configuration for replication at additional locations
- Choose mounting hardware that accommodates future plate additions
Maximizing your Milwaukee PACKOUT investment requires strategic wall mounting that transforms portable storage into permanent organization infrastructure. Whether outfitting a home garage, equipping a commercial workshop, or optimizing a service vehicle, the right wall mount configuration dramatically improves workflow efficiency while protecting your valuable tools. Start with Milwaukee’s official Large Wall Plate for foundational installations, then explore third-party solutions and custom fabrication options to address specific requirements. Remember to always respect weight capacity ratings, select appropriate fasteners for your wall type, and plan for future expansion—these practices ensure your PACKOUT wall system delivers reliable performance for years of professional use. With these Milwaukee PACKOUT wall mount ideas, you’ll transform disorganized spaces into highly functional work environments that follow your natural workflow patterns and adapt as your needs evolve.

