
Your Sony television has arrived, and you’re ready to transform your viewing experience with a clean wall-mounted setup. But what if you discover missing hardware after unpacking, or find that your retail store’s advice about mounting capabilities was completely wrong? Thousands of Sony TV owners face these exact frustrations, often because critical differences exist between models like the KDL55W800B and its 50-inch counterpart. This guide cuts through the confusion with precise, model-specific instructions for successful Sony wall mount installation—so you avoid costly errors and wasted time.
Most Sony televisions, including popular models like the KDL55W800B, are VESA compliant but ship with incomplete mounting hardware that varies significantly by screen size. The 55-inch version includes “Wall Mount Attachment” screws but no actual brackets for stand conversion, while the 50-inch model comes with complete hardware. Retail representatives frequently provide incorrect information about compatibility, leaving customers stranded with hardware gaps. By following this guide, you’ll verify compatibility, secure the right components, and complete your installation correctly—whether you choose third-party VESA mounts or Sony’s proprietary system.
Confirm Your Sony TV’s VESA Pattern Before Buying Hardware
Skip this verification step and you’ll likely face returns, delays, and mounting failures. Your Sony television’s VESA pattern—measured as the horizontal and vertical distance between the four mounting holes on the rear panel—determines which wall brackets will work. Most 55-inch Sony models like the KDL55W800B follow standard VESA patterns, but don’t assume compatibility based on screen size alone.
To check your VESA pattern:
– Remove plastic caps covering the mounting holes on your TV’s back panel
– Measure center-to-center between the top two and side two holes (typically 200x200mm, 300x300mm, or 400x400mm for larger models)
– Cross-reference with your model’s specifications in the Sony support documentation
Many customers discover too late that their 55-inch W800B requires third-party VESA mounts since Sony doesn’t include conversion brackets. Unlike the 50-inch version which ships with complete stand conversion hardware, the 55-inch model only includes attachment screws. Verify your specific model’s requirements before purchasing any mounting equipment to avoid this common pitfall.
Why VESA Compatibility Varies Between Identical Model Series
The KDL55W800B and KDL50W800B share the same product line but have critical mounting differences. The 50-inch model includes all necessary hardware to convert its stand into a wall bracket, with instructions in the original packaging. The 55-inch version lacks these components entirely—you’ll need either a third-party VESA mount or Sony’s SUWL450 kit. Retail sales staff often don’t know this distinction, so always check official Sony documentation before installation.
Get the Right Tools and Missing Hardware Before Starting
Your Sony wall mount installation will stall immediately without these essentials: Phillips-head screwdrivers, a stud finder, level, measuring tape, drill with appropriate bits, and wall anchors rated for your TV’s weight. But the bigger challenge is securing the correct mounting hardware—Sony’s inconsistent packaging means you might have only partial components.
How to Handle Missing Sony Wall Mount Components
If your Sony TV box contains “Wall Mount Attachment” screws but no brackets, you have two options:
-
Order the SUWL450 kit from Sony: Contact Sony support directly and request the Wall Mount Bracket kit. Be prepared to escalate to management—many customers report initial representatives providing incorrect information. Sony typically ships this hardware free of charge, but delivery takes about two weeks.
-
Use third-party VESA mounts: Purchase a standard VESA-compatible mount matching your TV’s pattern. This approach works immediately since the KDL55W800B includes the necessary attachment screws. Confirm the mount supports your TV’s weight (typically 45-60 lbs for 55-inch models).
Pro Tip: Download your model’s manual from Sony’s support website before contacting customer service. Having the exact documentation helps overcome misinformation from retail staff or untrained support agents.
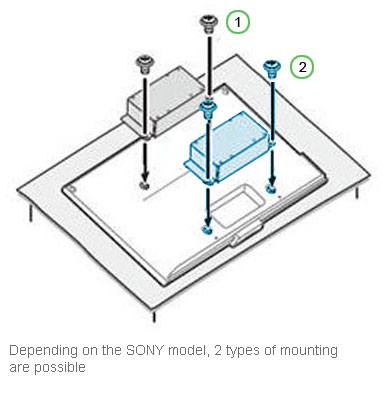
Install Your Sony TV with the SUWL450 Bracket Kit
When you need Sony’s authentic mounting solution, the SUWL450 kit positions your television approximately 8.5cm (3.5 inches) from the wall—providing space for ventilation while maintaining a clean profile. This method converts your table-top stand into a wall bracket, preserving the original design aesthetic.
Step-by-Step SUWL450 Installation
- Remove your television’s table-top stand following Sony’s instructions
- Attach the SUWL450 bracket components to the stand mounting points
- Secure the wall plate to studs using appropriate hardware (never drywall alone)
- Lift the TV and engage the bracket with the wall plate
- Verify secure attachment by gently tugging the television
This method works only with Sony-provided hardware. Unlike third-party VESA mounts, the SUWL450 kit uses your existing stand components, eliminating storage issues. However, the two-week wait for Sony to ship the kit makes this option impractical if you need immediate installation.
Mount Your Sony TV Using Standard VESA Brackets
For faster installation without waiting for Sony parts, standard VESA mounting works reliably with the KDL55W800B. The included attachment screws let you connect directly to any compatible third-party bracket, positioning your TV flush against the wall.
Critical VESA Mounting Steps
- Locate wall studs: Use a quality stud finder to identify at least two studs supporting your TV’s weight
- Position at eye level: Center of screen should align with seated eye height (typically 42 inches from floor)
- Install wall plate securely: Use 3-inch lag bolts into studs—never rely solely on drywall anchors
- Attach mounting plate: Use Sony’s included long screws through the TV’s VESA holes
- Engage the mount: Have a helper lift the TV while you connect it to the wall plate
Warning: Over-tightening screws can strip the TV’s mounting threads. Hand-tighten until snug, then give a quarter-turn with a screwdriver—no more.
Fix These Common Sony Wall Mount Installation Errors

Even experienced installers make these critical mistakes with Sony televisions:
Mistake #1: Assuming Hardware Completeness
Sony packages “Wall Mount Attachment” screws with the KDL55W800B but no conversion brackets—leading customers to believe installation is complete. Always unpack completely and compare contents against the inventory list before starting.
Mistake #2: Mounting Without Verifying VESA Pattern
One user discovered their 55-inch W800B required a 400x400mm mount while they’d purchased a 300x300mm bracket. Measure your TV’s pattern yourself rather than trusting packaging claims.
Mistake #3: Ignoring Physical Clearance Issues
The stand conversion method positions the TV 8.5cm from the wall with the SUWL450 kit, but some users found their cable connections couldn’t reach. Test your configuration with the TV resting against the wall before drilling any holes.
Troubleshoot Sony Mounting Problems Immediately
If your Sony wall mount installation isn’t going smoothly, address these issues before proceeding:
Mount Doesn’t Align with TV Holes
Double-check your VESA pattern against the mount’s specifications. The KDL55W800B typically uses a 400x400mm pattern—confirm this matches your bracket. If not, return the mount immediately rather than forcing installation.
Wall Bracket Feels Loose or Unstable
Stop installation immediately and reassess. Large Sony TVs require mounting into wall studs with appropriate hardware. Drywall anchors alone cannot support 55+ inch televisions. Use a stud finder to relocate your mount if necessary.
Sony Support Gives Incorrect Information
Document your interactions and request escalation to a technical specialist. Multiple users found that managers and specialized support staff provided correct information about VESA compliance and hardware availability, while frontline representatives did not.
Maintain Your Wall-Mounted Sony TV for Longevity
Your Sony wall mount installation isn’t complete after hanging the TV. Regular maintenance prevents failures and extends your television’s life:
- Check mounting security quarterly: Vibration can loosen screws over time—retighten as needed
- Clean ventilation ports monthly: Wall-mounted TVs have reduced airflow—use a soft brush to remove dust
- Inspect wall surface annually: Look for cracks or stress points that could compromise mounting integrity
The KDL55W800B and similar models require adequate ventilation space behind the unit. With the SUWL450 kit, the 8.5cm gap provides sufficient airflow, but third-party mounts positioned flush against the wall may need additional spacing solutions.
Your Sony wall mount installation should enhance your viewing experience, not create frustration. By confirming VESA compatibility before purchasing hardware, securing the right components (whether third-party mounts or Sony’s SUWL450 kit), and avoiding common installation errors, you’ll achieve professional results. Remember that Sony provides missing hardware free of charge—just be prepared to navigate their support system with documentation in hand. With proper installation and regular maintenance, your wall-mounted Sony television will deliver years of space-saving, immersive entertainment without a single mounting-related issue.

