
Nothing ruins a cooking experience faster than smoke filling your kitchen or persistent odors lingering for hours after dinner. Properly installing a wall mount range hood solves these problems by efficiently removing smoke, grease, and harmful cooking fumes at the source. This comprehensive guide gives you everything needed to complete a professional-quality wall mount range hood installation without hiring expensive contractors. You’ll learn precise measurements, ductwork routing secrets, and critical safety steps that ensure your ventilation system operates at peak efficiency for years to come.
Kitchen ventilation isn’t just about comfort—it’s a health necessity. Cooking with gas produces over 200 harmful gases, including known carcinogens that circulate throughout your home without proper extraction. A correctly installed wall mount range hood creates an invisible barrier that captures these contaminants before they spread, protecting your family’s respiratory health while keeping your kitchen surfaces cleaner by preventing grease buildup.
Why Your Wall Mount Range Hood Installation Must Meet Building Codes
Skipping building code verification before your wall mount range hood installation risks failed inspections, voided insurance coverage, and potential safety hazards. Local regulations vary significantly—some municipalities require minimum CFM ratings based on your cooktop type, while others mandate specific duct materials or maximum run lengths. Contact your building department before purchasing equipment to confirm requirements for your area. This single step prevents costly rework when you discover your planned duct route violates local codes or your chosen hood lacks sufficient airflow capacity for your kitchen size.
Precise Measurements That Make or Break Your Installation Success
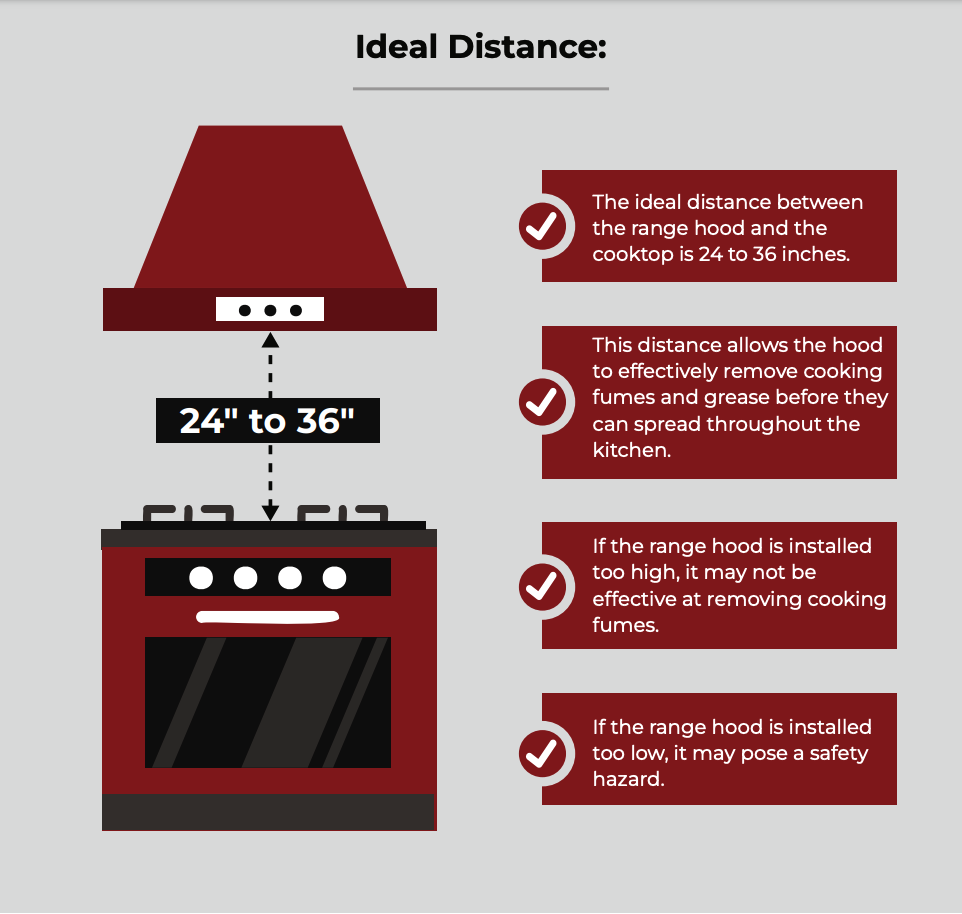
Mounting your range hood at the wrong height creates immediate performance issues you’ll battle for years. Gas ranges demand 24-30 inches between burners and hood bottom, while electric cooktops require 20-24 inches. Measure twice before marking any drill points—too low risks fire hazards from accumulated grease igniting, while too high drastically reduces suction power. Use a laser level to draw both vertical centerline and horizontal height reference lines on your wall before mounting any hardware. This simple step ensures perfect alignment that makes duct connections seamless and creates a professional appearance that enhances your kitchen’s aesthetics.
Why Your Duct Run Length Determines Ventilation Performance

Maximum recommended duct run for residential installations is 16 feet with no more than three bends—and right-angle turns should be avoided completely. Each bend reduces effective CFM by up to 25%, turning a powerful 600 CFM hood into a struggling 300 CFM unit. Plan your route by identifying the closest exterior wall and mapping the straightest possible path. If routing through ceiling joists, verify you won’t compromise structural integrity—never cut through joists to create duct pathways. When obstacles force bends, use 45-degree elbows instead of 90-degree turns to maintain airflow efficiency.
Essential Tools and Materials Checklist for Flawless Installation
Gather these specific items before starting your wall mount range hood installation to avoid frustrating mid-project hardware store trips:
- 6-inch hole saw (for duct penetrations)
- Aluminum duct tape (NOT regular duct tape)
- PVC trim board (for exterior mounting plate)
- Self-tapping exterior screws
- Silicone adhesive and exterior-grade caulking
- Angle grinder (for exterior wall preparation)
- Wall cap with built-in damper
Skip the common mistake of using flexible ducting for your entire run—rigid metal ductwork maintains airflow efficiency while reducing fire risk. Flexible duct should only be used for short connections between rigid sections where slight movement occurs.
Critical Electrical Safety Steps Before Powering Your Hood
Working with electricity requires absolute caution during your wall mount range hood installation. Turn off the circuit breaker controlling the kitchen outlet and verify power is off with a voltage tester—never assume the breaker works correctly. Most range hoods require dedicated 15-amp circuits, so check your model’s specifications before connecting. If your kitchen lacks proper electrical access near the hood location, hire a licensed electrician rather than attempting DIY wiring modifications that could violate code or create fire hazards.
Creating Perfect Exterior Wall Penetrations in 3 Steps
How to Install a Weatherproof Wall Cap That Prevents Drafts and Leaks
- Cut a mounting plate from PVC trim board matching your wall cap dimensions
- Apply silicone adhesive around the exterior wall opening
- Secure the plate with screws and caulk all edges thoroughly
This three-step process creates a uniform mounting surface that ensures watertight integration with your home’s exterior. Without this plate, irregular siding or stucco surfaces create gaps that allow rain, pests, and cold air to enter your duct system. The damper in your wall cap should open automatically when the fan runs and seal tightly when off—test this function before finalizing your installation.
Mounting Your Range Hood Body Without Common Alignment Mistakes
Anchor mounting brackets directly into wall studs using 3-inch screws—drywall anchors alone will eventually fail under operational vibration. Lift the hood body into position and verify it sits perfectly flush against the wall before securing final connections. A gap of even 1/8 inch creates noise during operation and reduces suction efficiency. Connect the ductwork to the hood’s outlet adapter and seal all joints with aluminum tape—this critical step prevents 30% of common post-installation airflow issues caused by leaky connections.
Testing Protocol That Verifies Proper Function Before Finalizing
Don’t skip these verification steps after completing your wall mount range hood installation:
- Run the fan at maximum speed and hold tissue paper over the cooking surface (it should stick firmly)
- Check all duct connections for air leaks by feeling for escaping air
- Verify the exterior wall cap damper operates correctly
- Test under actual cooking conditions with a lightly smoking pan
Poor smoke capture typically indicates either incorrect installation height, excessive duct bends, or clogged filters—not a defective unit. Address these issues immediately before declaring your installation complete.
Monthly Maintenance Routine That Preserves Peak Performance
Clean metal grease filters in warm, soapy water every 30 days—grease buildup reduces airflow by up to 50% within months of installation. Ductless models require charcoal filter replacement every six months since these filters cannot be cleaned effectively. Perform annual inspections of your entire duct run, checking for loose connections, pest intrusion, or exterior cap obstructions. A few minutes of maintenance prevents costly repairs and ensures your wall mount range hood installation continues performing like new for its full lifespan.
Troubleshooting Poor Smoke Capture After Installation
When your newly installed range hood fails to capture smoke effectively, check these three common culprits first:
- Ductwork issues – Excessive bends, kinks, or flexible duct sections longer than 5 feet
- Filter problems – Grease-saturated filters restrict airflow dramatically
- Height miscalculation – Even 2 inches too high significantly reduces capture efficiency
Adjust fan speed to the minimum setting that maintains clear visibility at the cooking surface—running at unnecessarily high speeds creates noise without improving performance. If problems persist after checking these factors, consult your manufacturer’s specifications for model-specific troubleshooting guidance.
A successful wall mount range hood installation transforms your kitchen from a smoke-filled workspace into a comfortable cooking environment where you can prepare meals without battling lingering odors or grease-coated surfaces. By following these precise measurements, ductwork routing principles, and verification steps, you achieve professional results that protect your family’s health while enhancing your home’s value. Remember that proper installation creates the foundation for years of reliable service—rushing through measurements or skipping critical sealing steps leads to performance issues that diminish your investment’s value. Take the time to do it right the first time, and your wall mount range hood will operate efficiently long after the installation tools return to the toolbox.

